When it comes to publishing video content online, YouTube is certainly the most popular platform. In fact, YouTube is now synonymous with internet video. If you already have a plan to create your own channel, then learning how to make a YouTube video for free quickly makes sense.
Now does that mean it's going to be a complicated and time-consuming process? Absolutely NOT! We will tackle all the basics and provide you with every essential information you need for creating your best YouTube video.
From planning to creating and editing, we have got you all covered. We promise, by the end of this blog, you'll be able to make a YouTube video in a few minutes.
So, let's get started.
How to Make a YouTube Video Online
Log in to typito.com. If you haven't signed up, register for free. Click on New Project from the homepage.
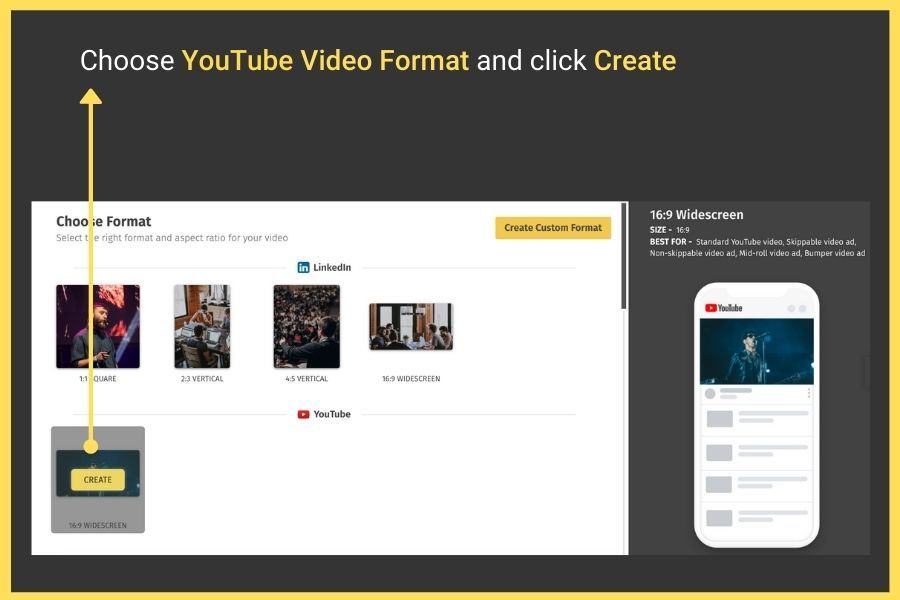
Select YouTube from the list of video formats shown. Hover on it and click Create.
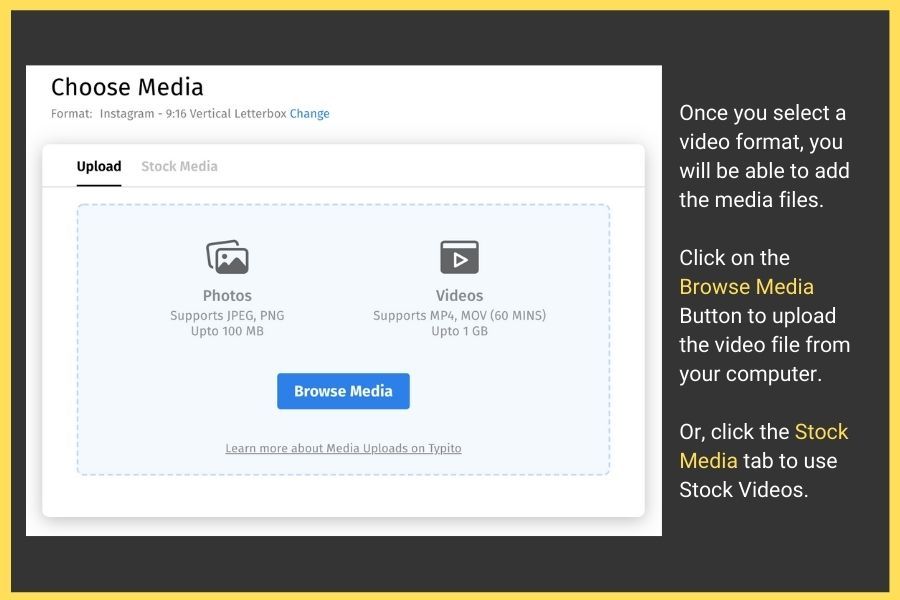
Once you choose the video format, you will be redirected to a page with an option to either upload your shot video or choose from the stock media library.
The import process begins which might take from a few seconds to minutes, depending on the size of the video. Once that's done, click on the Start Editing button on the right.
You will be redirected to Typito's dashboard with the uploaded video in the YouTube video format (or dimensions) you have chosen.
On the left, you will see 5 different tabs to play around with your YouTube video, which include:
- Text
- Images
- Audio
- Media
- Captions
Make a Youtube Intro for your video:
Capture your audience and turn them into loyal subscribers with an impressive intro and colorful text.
A good intro not only sets the rhythm of your YouTube videos but also makes sure that they are super engaging.
You don't need complicated tools to do this job for you. Happily, Typito has this covered. In fact, adding your channel name in the intro with Typito is simple, quick, and friendly.
All you have to do is:
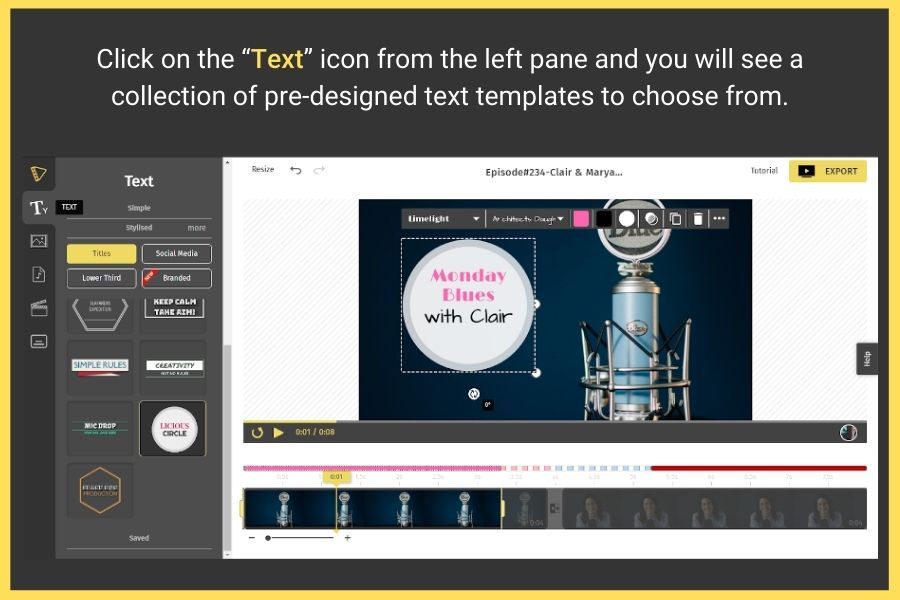
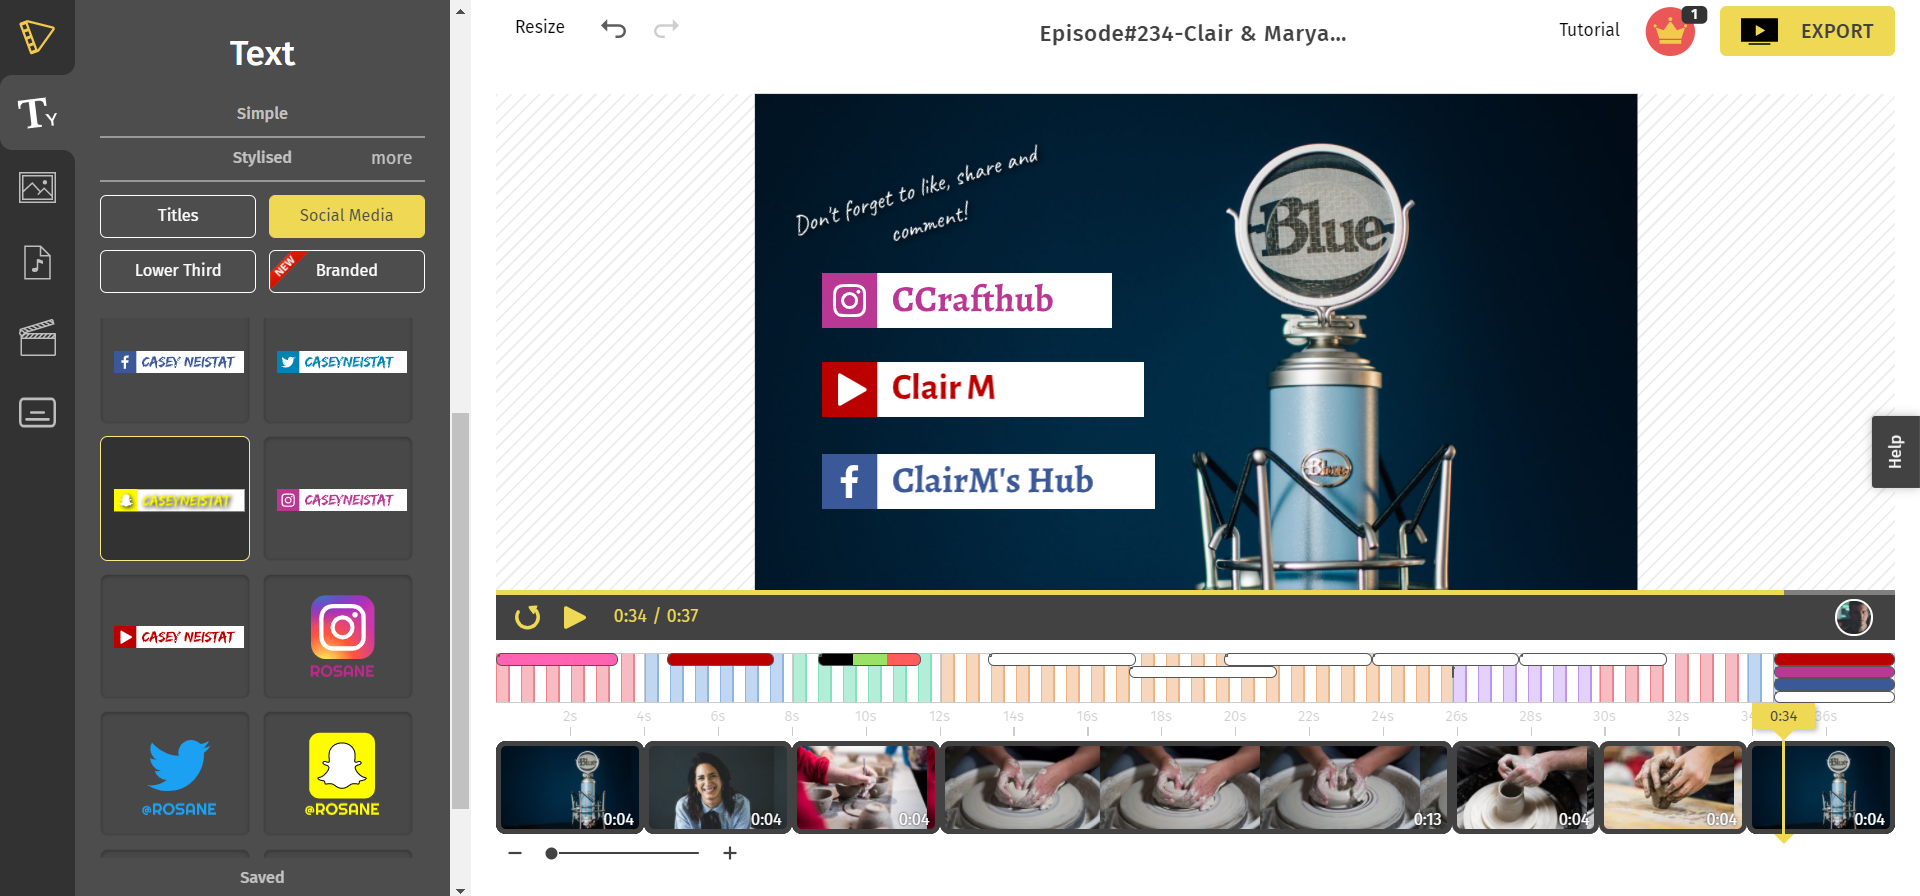
- Click on the "Text" icon from the left pane and you will see a collection of pre-designed text templates to choose from.
- The tool also offers a wide range of stylized text templates that you can use and customize, which ranges from basic to advanced animated text templates.
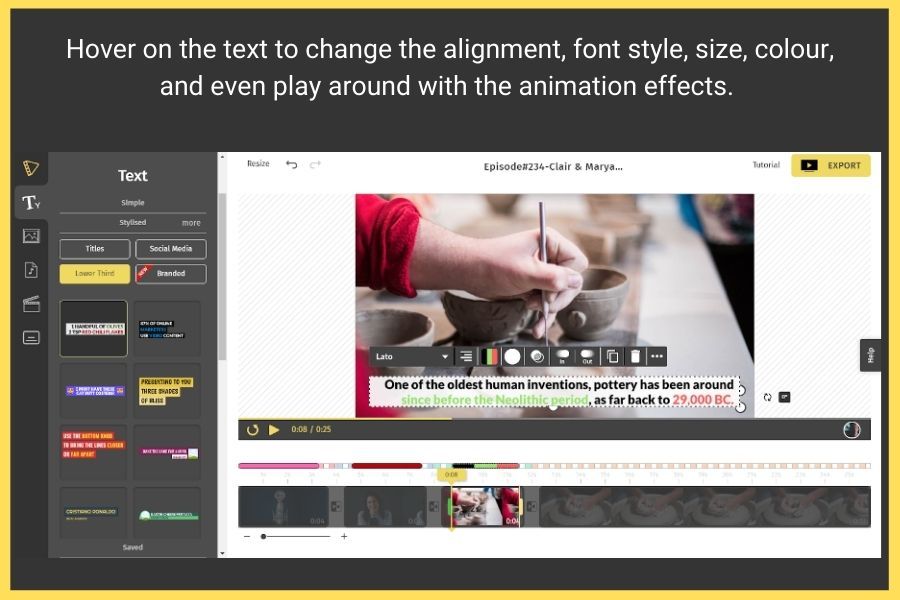
- A quick hover on the text lets you play around with the styling and formatting. From adjusting the spacing to adding animation effects to changing the font style, size, and colours, there's a lot that you can do.
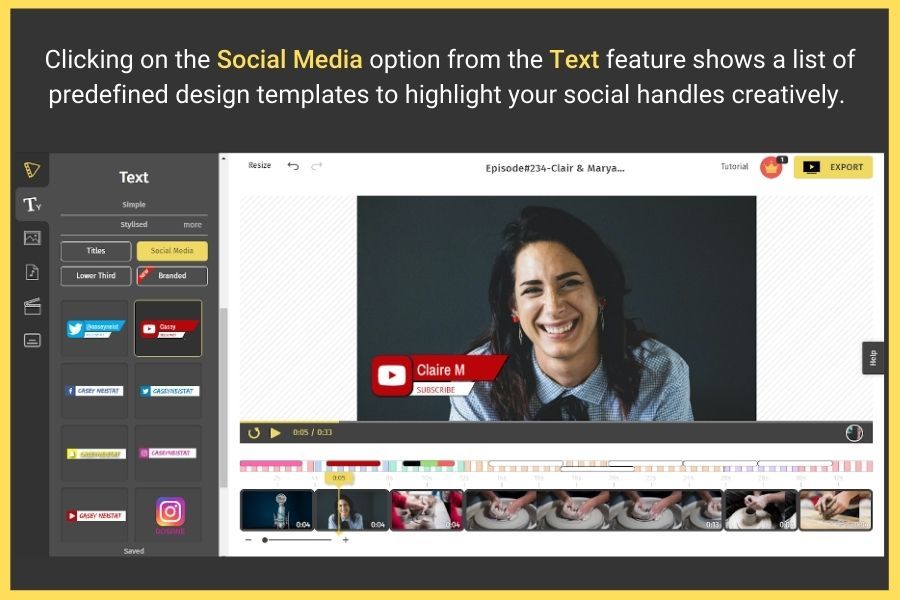
- The "text" feature also includes 4 other subcategories to use text in interesting ways:
- Titles to add to the beginning if your Youtube Video
Social Media Text Templates
- Lower Third Caption Templates
- Branded Templates let you add a logo design to your video
In order to use any of these templates, all you have to do is click and it gets added to your video. The applied text template can then be dragged wherever you want to place it on the video.
If you're still not sure of how to add your channel name creatively in the intro, try one of our predefined intro templates and pick your favorite. From creating animated channel names to adding your animated logo, you can play around and see what looks great for the content you create.
2. Add Images overlays to your Youtube video
Whether you want to add an image overlay to the middle of your clip, add a logo to the video, or probably, just want to add some shapes, Typito's "image" feature is all you need.
- Click on the "Image" icon from the left pane. This will show you 3 options: Shapes, Icons, and My Uploads.
- The My Uploads section is a space where you can upload your own icons, images, or logos that you want to add to your video.
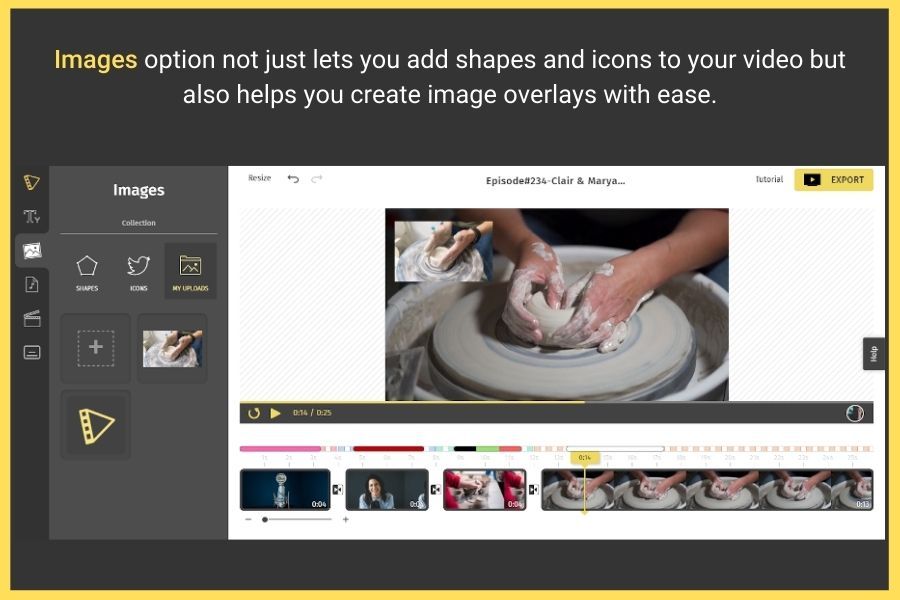
- Once you have uploaded your logo, icon, or image, click once on it to insert it to the video workspace.
Wish to create or add your YouTube channel logo or name through shapes or icons? Perhaps, highlight your logo inside a nice shape? Then, just browse the shapes or icons category to create a logo or overlays.
- The Shapes feature has an array of predefined geometric shapes that you can insert into your video.
- The Icons feature has the icons of a few popular social media platforms.
3. Add Audio to your Youtube Video
Undeniably, videos with good sound have a higher chance of capturing attention and increasing engagement from viewers. The scenario is especially true if you don't have any text captions on it, or may not have any captivating visuals.
For videos that are simple, the right track may just be the differentiator that can hook attention-right from the intro to the outro. With a few rhythms and beats, you can easily trigger as well as amplify emotions for your brand.
Adding audio or music to your video is pretty simple with Typito. Here's what you need to do:
- To add music or audio to your YouTube video, click on the Audio icon from the left pane of the dashboard.
- You will see two options: Library and Uploads.
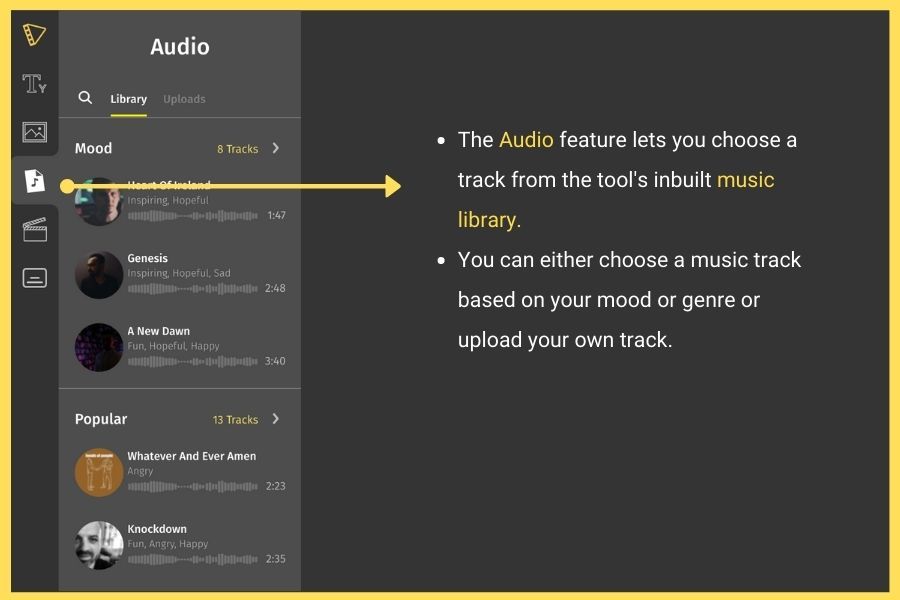
- The "Library" option features an inbuilt music library with more than 150 tracks, organized based on genres and mood. Click on the "Add" button to add the music to your YouTube video.
- The "Upload" option lets you upload your own music from your local drive.
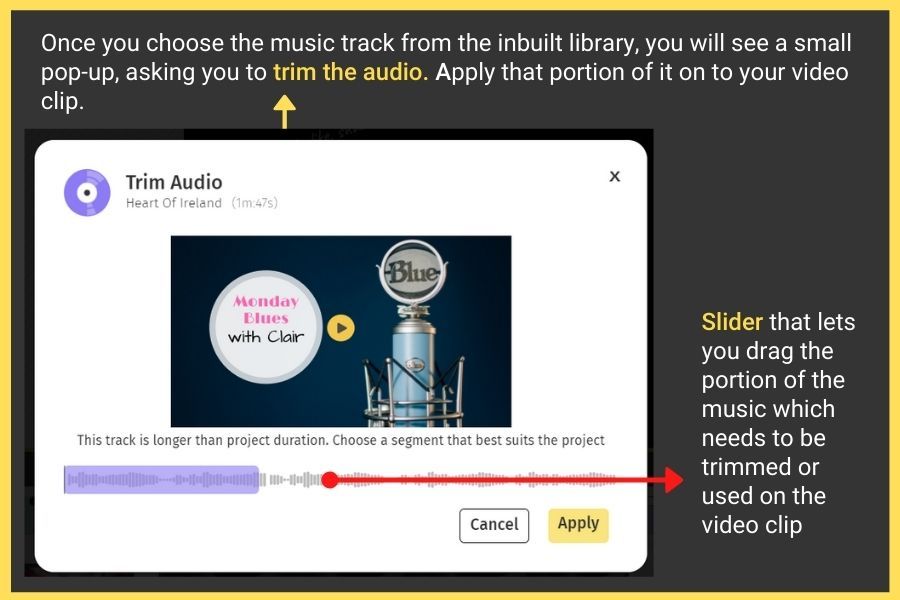
- Once you hit the "add" button, you'll quickly get a pop-up, which lets you trim the audio via a draggable slider and use the specific audio portion to your video.
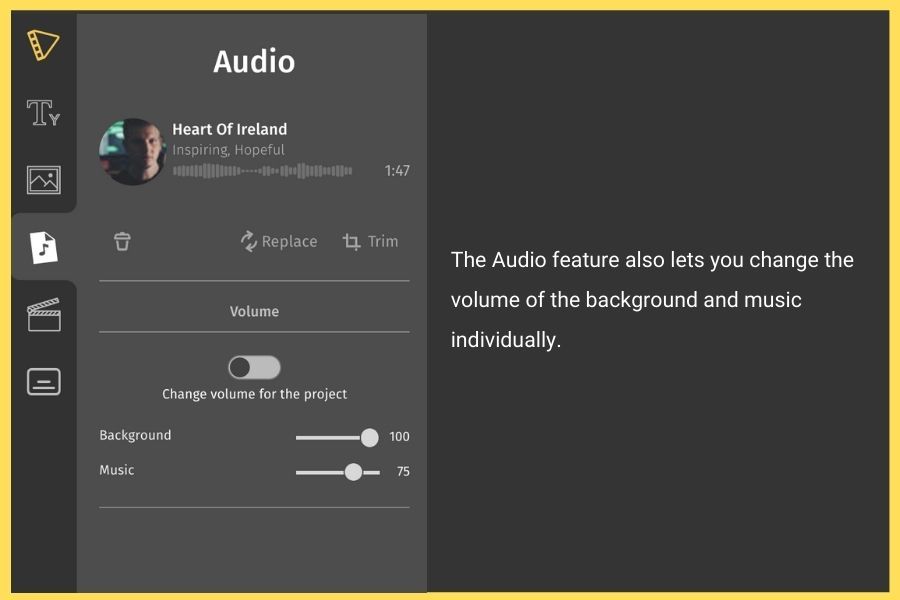
- Once you add the music, you can change the volume of the music and background anytime.
4. Add Subtitles to your Youtube Video
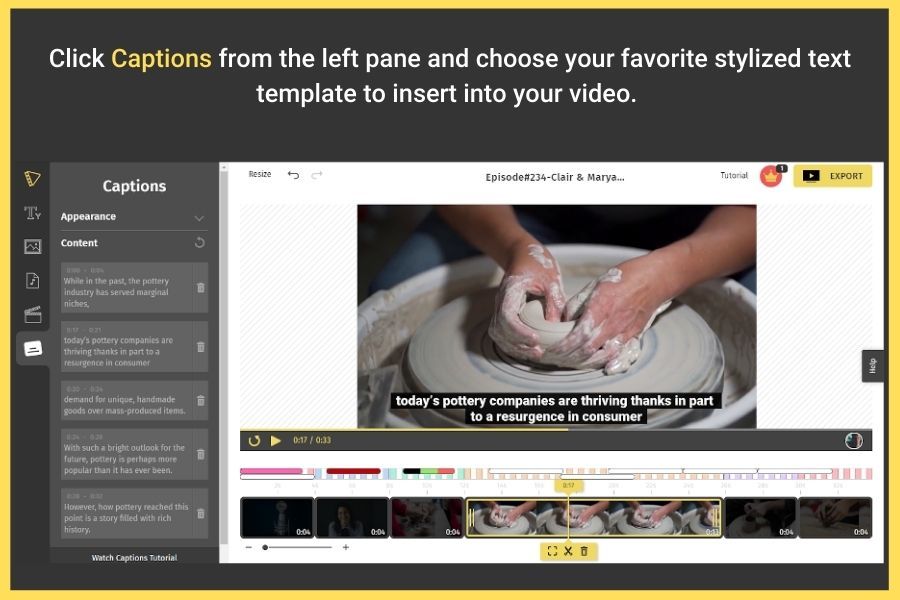
Adding captions and subtitles to your video is pretty straightforward with Typito. This is where the "Captions" feature comes in handy. All you have to do is:
- Click on the Captions tab from the left panel. This gives you access to a wide range of basic as well as stylized text templates.
- Click on your favorite text template to insert in your video. This will give you a preview of how it looks.
- You can even align the caption to the top, middle, or bottom of your video.
- Click on the "Next, add content" button from the left.
The tool then lets you add content for the captions in 3 ways:
- Auto Caption using automated Voice to Text transcribing
- Uploading an SRT file
- Adding Captions Manually
Watch this YouTube Video to learn how to add captions
Pro Tip: To give that "extra" push and get your audience to explore your other social media handles or to press the subscribe button, a good outro is what you need. Browse through some of our predefined motion graphics outro templates and choose one that goes with your video design and start editing it on the dashboard.
Once you have played around with all the features to edit and perfect your video, the only thing that's left is to download your YouTube video.
- Click on the Export button from the top right corner.
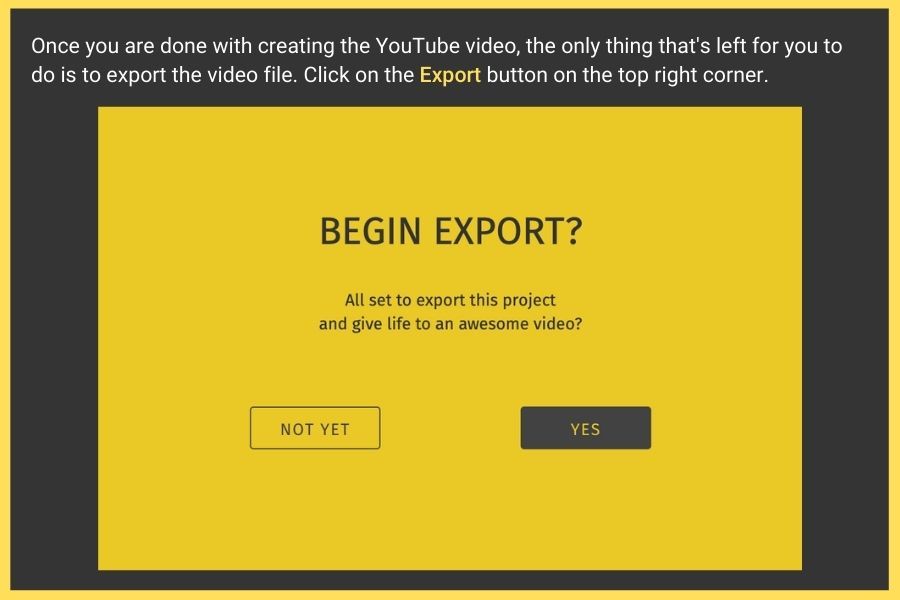
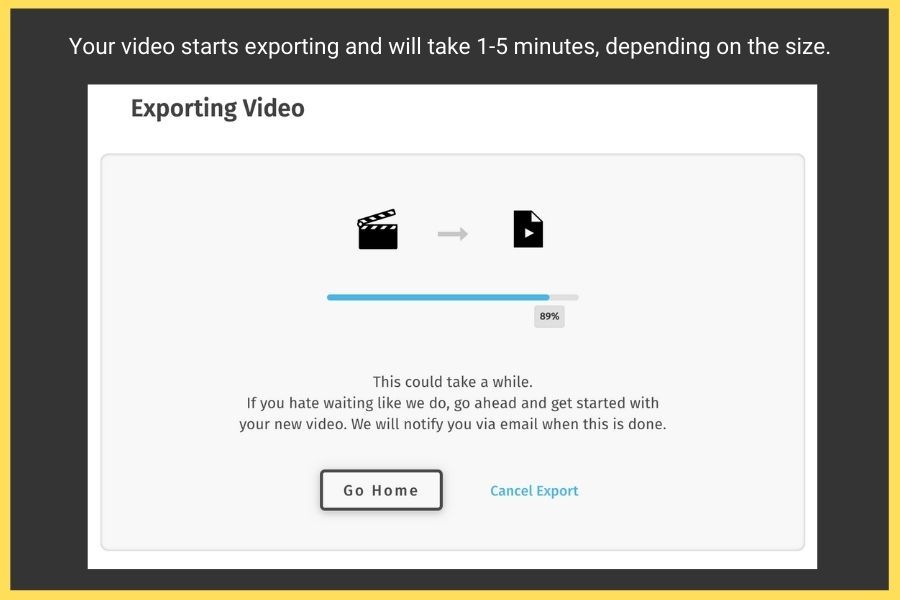
- The export process begins and may take from a few seconds to minutes, depending on your video size.
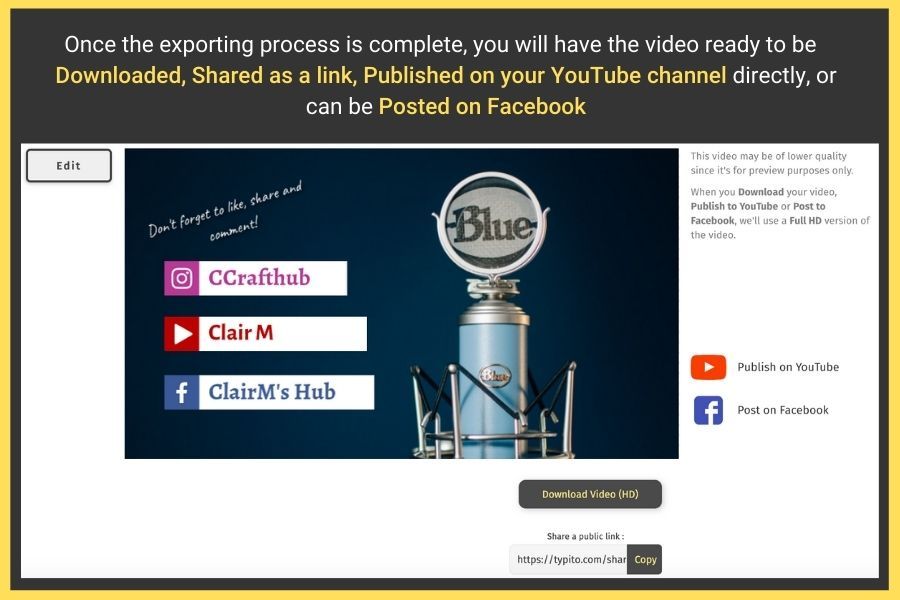
Once that's complete, your YouTube video is ready to be:
- Downloaded in HD and saved to your local drive
- Published to your YouTube channel directly
- Shared on Facebook
Now that you have learned how to make a YouTube video online, it's time to get started. But before that, follow these tips to ensure you create things professionally.
Equipment You Need to Shoot Good Videos for YouTube
Creating good-quality videos isn't as simple as it seems. Fortunately, you don't need extensive technical know-how to produce the type of content which people will love watching-all you need is the right equipment.
Of course, you can create vlogs with minimal equipment but that was a decade ago. Things have changed since then and quality standards have evolved.
Speaking of revenues in the current scenario, a good YouTube channel has the potential to generate millions per year. Also, YouTubers competing at such levels spend decent money to create professional-looking results.
As a beginner, it's important to put a little effort into your video's visual quality to make sure that you keep things engaging and increase the chances of gaining subscribers.
Most established YouTubers utilize different video production equipment (a few even hire professional camera operators and video editors) to produce high-quality videos-but you don't really have to go that far.
Having said that here's a clear list of basic equipment required for video production:
1. Camera
The most vital piece of equipment to have is a camera. However, before heading to the shop, understand that you don't really have to buy an expensive DSLR-interestingly, you can use anything that can record a high-quality (minimum 1080p) video. For example, you may look online for the best mirrorless camera under 1000 dollars and start with that, then progress as you gain experience with cameras.
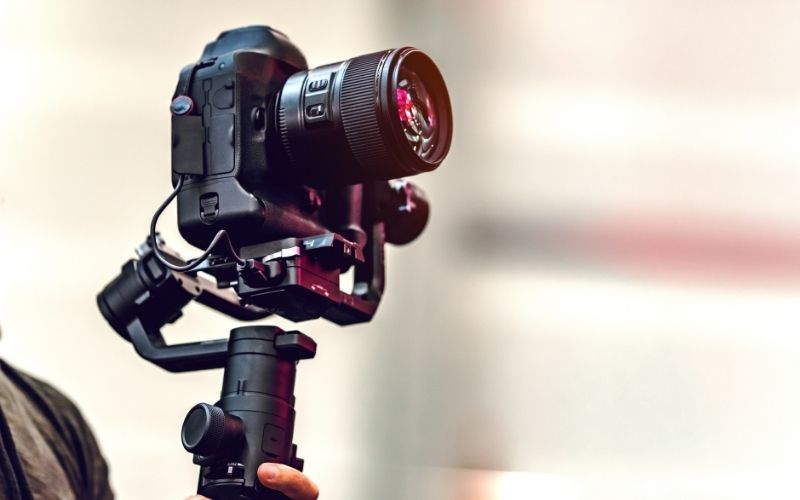
Quality webcams or camcorders would be enough if you are just beginning, but mirrorless cameras and DSLRs are an ideal investment when you are all set to upgrade. Keep in mind that the type of camera you buy highly depends on what type of video content you desire to create.
When it comes to camera, here are the following types you can use to shoot videos:
- Camcorders: These are excellent options for making YouTube videos, as they are exclusively designed for recording videos. Modern camcorders are fairly affordable, lightweight, compact, and designed to handle any shooting situation-be it on-the-go vlogging or filming it at home.
- Smartphones: Most smartphones can shoot videos. In fact, a few can even shoot high-quality 4K videos, although 1080p is good enough when it comes to YouTube. Moreover, smartphones are portable and are super handy. Thus, making them extremely useful for "roving reporters" and travel applications. But they still should be used on a good tripod to stabilize the movements.
- Digital cameras: These are another great option for capturing videos. Here's a tip-a digital camera is useful if it features a microphone port and an articulated screen. Also, the screen must flip around to help you see that you are in the frame. In addition, the mic port allows you to use an external microphone.
- Action cameras: These are admired to be the most versatile and compact camera type. They are perfect for intrepid videographers and photographers who want to shoot extreme sports adventures or first-person POVs (Point of View) of their own travels. Besides their small size, most action cameras can produce the highest video quality.
2. External Microphones
Keep in mind that the quality of the audio has to complement the video. Even if you shoot the HD cinema 4K video, you will still have trouble keeping the viewers engaged if your audio is bad.
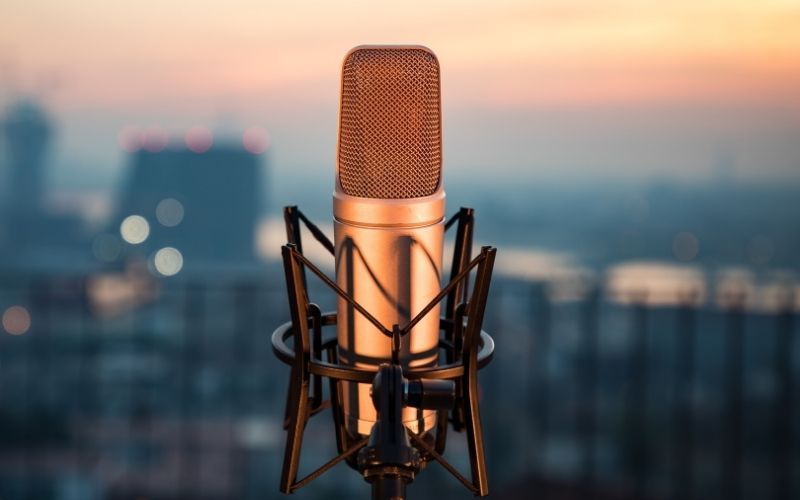
Usually, inbuilt cameras or laptop microphones have poor audio quality because they can't effectively record or remove ambient sounds. Therefore, the next most crucial tool for making a Youtube video is a microphone.
But before you head to buy one, know that there are different types of microphones available in the market. So make sure to buy the one for your needs.
- USB microphones: These have gone from being completely unheard of to being the standard pick for YouTubers. These mic types are easy to use and offer excellent sound quality. Most importantly, they are versatile and affordable.
- Condenser microphones: These don't need any pre-amp and allow self-monitoring via their inbuilt headphone jack along with volume control. They also offer mix control to help you blend microphone audio with pre-recorded audio.
- Shotgun microphones: These are pretty popular too. In fact, these are high-quality options when it comes to video recording with a professional yet small camera. They are built with shock mounts to help lessen the noise which comes from the mic's mechanical vibrations. When you buy one, make sure that it can capture vocals and sounds clear as well as directly. It shouldn't pick any ambient sounds from the sides or behind while recording outdoors.
- Lapel microphones: These are wireless microphones that can be clipped discreetly to your belt or clothes. These include a transmitter where the lapel is connected. The receiver can pick signals from the transmitter even from the farthest distances.
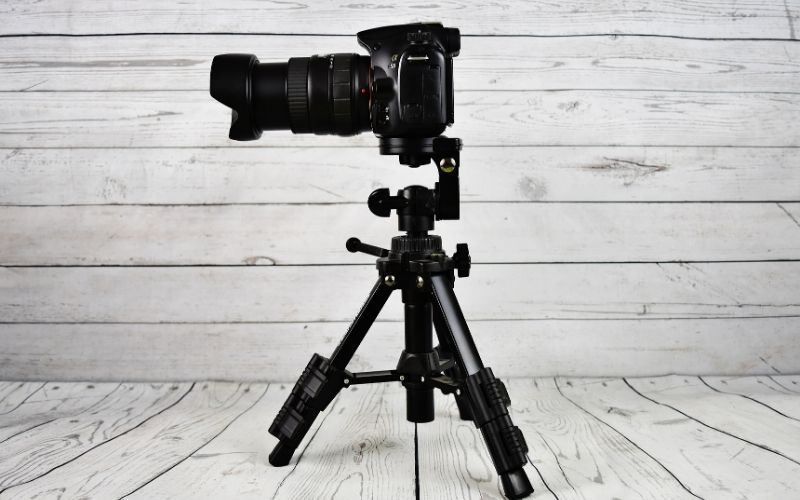
3. Gimbal Stabilizers and Tripods
When it comes to professional video making, shaky footage is a big no, as it distracts your viewers and makes them dizzy. That's where the use of Gimbal Stabilizers and Tripods comes in handy. They are great tools to stabilize your videos and photos.
Let's understand both of these equipment a little:
- Tripods: These are affordable and most YouTubers don't go above $100 and still do pretty well with videos, depending on your camera weight. However, it is advisable to put your money on a sturdier and reliable tripod that can last longer and ensures the camera's safety.
- Gimbal Stabilizers: No matter how steadily you hold the camera, handheld shooting produces jarring and shaky videos. That's why you need Gimbals to fix the issue. They're specialized stabilizers exclusively built with weights or motors to balance the camera carefully and further, smoothen your videos (despite purposely making sudden and big movements). These are especially useful for YouTubers who use lightweight cameras such as GoPros or are always moving.
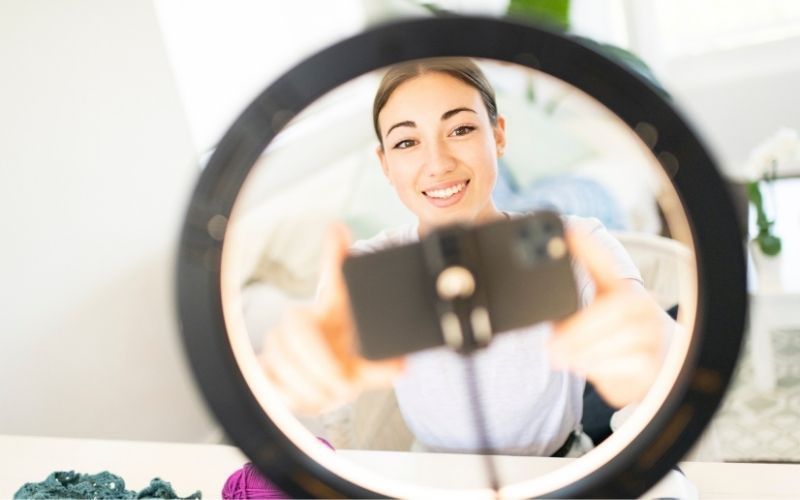
4. Lighting
Lighting is yet another essential piece of equipment if you are someone who primarily records indoors or in dim-lit areas. If you are shooting where there is ambient light, good lighting equipment helps modify the overall mood and evens out the entire brightness of the video setup.
You will find a plenty of lighting equipment in the market and here are a few types of make use of, based on what you are filming:
- Ring lights: These are a favorite among vloggers. They are designed to emit light around the subject and eliminate shadows from each direction. Thus, making a person look attractive in front of the camera. That's why these types of lights are often used by makeup and beauty vloggers to not just light up their faces beautifully but also to eliminate shadows that highlight blemishes.
- Umbrella lights: These are portable and inexpensive options for video creators who prefer soft lighting. Umbrella lightings create better-controlled lighting because the light is reflected from the interior silver layer. It does not have any diffusing sheets but can easily cover an expansive part of the space. They are perfect for on-location shoots and backdrops.
- Softboxes: These can emulate soft, natural lighting from the window, which is mainly due to the white diffusion panel, which diffuses as well as decreases the overall intensity of the direct, harsh light. These types of lighting gears are good if you prefer adding some light without producing any harsh shadows for your subject or a scene.
- On-camera lights: These can be easily mounted on your cameras and give continuous lighting. They are ideal for recording specific types of videos like documentary channels, wedding videos, or any video content which involves people in dimly lit locations.
Conclusion
Now that you know how to make a YouTube video, you're all set to get started. But before you do that, pay attention to your lighting. For a beginner, besides paying attention to quality content, the right lighting makes all the difference. That doesn't mean you have to invest in heavy equipment. No.
Just try to shoot near a window where there's an ample amount of natural light shining right onto your face. If not, you can even invest in an inexpensive ring light. That should do the trick in creating a professional YouTube video. Then, for beautifying it, leave it to "Typito."