Ever scrolled through your social media feed, captivated by a video but unable to turn on the sound? You're not alone. We too have felt the pressing need for subtitles while scrolling through Instagram in a public place.
As video space grows, a million different opinions arise about doing it right. The majority say, having a beautiful video alone won't work. Captioning is important to watch videos too.
So why all the fuss about subtitles? Because the numbers don’t lie.
- Online video platforms are set to hit a market size of $915 million by 2025. That's a 17.5% jump from 2016's $218 million. Talk about growth!
- Facebook’s internal studies revealed that subtitles increase view time by a whopping 12%
- Even folks without hearing issues are watching videos silently. Blame (or thank) social media for this new habit!
A video without attractive subtitles is like a good pianist playing in an empty room. Learn how to add captions to videos online in just a few simple steps. Trust me, it isn't as time-consuming or complicated as it may seam.
Let's dive into the world of online video captioning and discover how it can transform your entire video and content!
Getting Started with Video Captioning
What is Video Captioning and Why is it Important?
Video captioning is the process of adding text boxes or overlays to your online video editor to subtitle files or content, representing the audio or dialogue. But why should you care about the subtitles to a video? Here's the scoop:
- Accessibility: With over 430 million people worldwide experiencing hearing loss, subtitles make your videos accessible to a broader audience.
- Engagement Boost: Did you know that Gen Z are more likely to watch content with subtitles than older folk? Facebook studies also found that videos without subtitles elicited a negative reaction from 80% of viewers. So if you want to impress the young crowd and keep them engaged for longer, subtitles are the way to go.
- SEO Magic: Search engines love text, and subtitles help your videos rank higher in search results.
- Language Barriers: Subtitles help non-native speakers follow along, expanding your global reach.
Preparing Your Video for Captioning
Before you jump into adding subtitles to your video file, you need to get your video ready. Here's how:
- Choose Your Format: On Typito, you will find formats for Linkedin, YouTube, Facebook, Instagram, and Twitter here along with the video aspect ratios these platforms support.
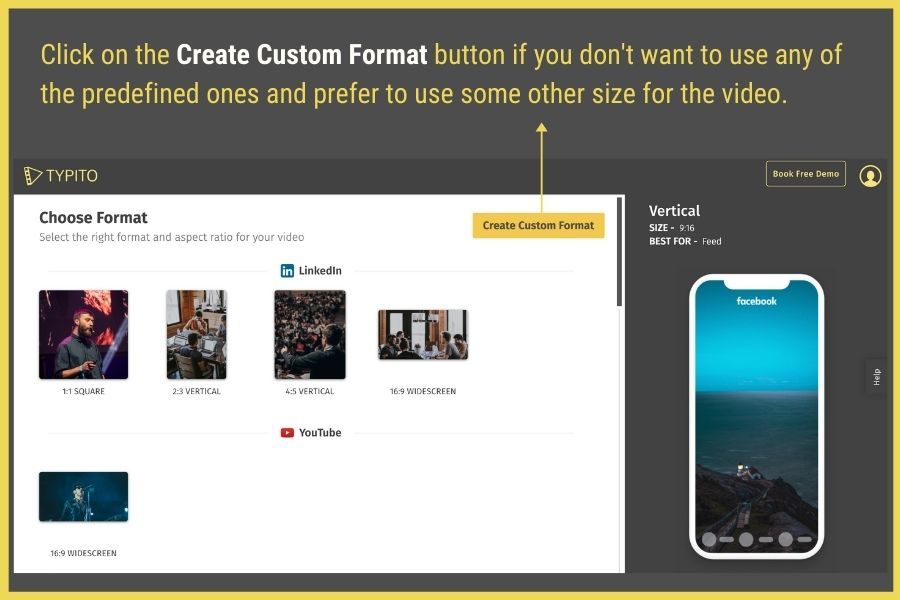
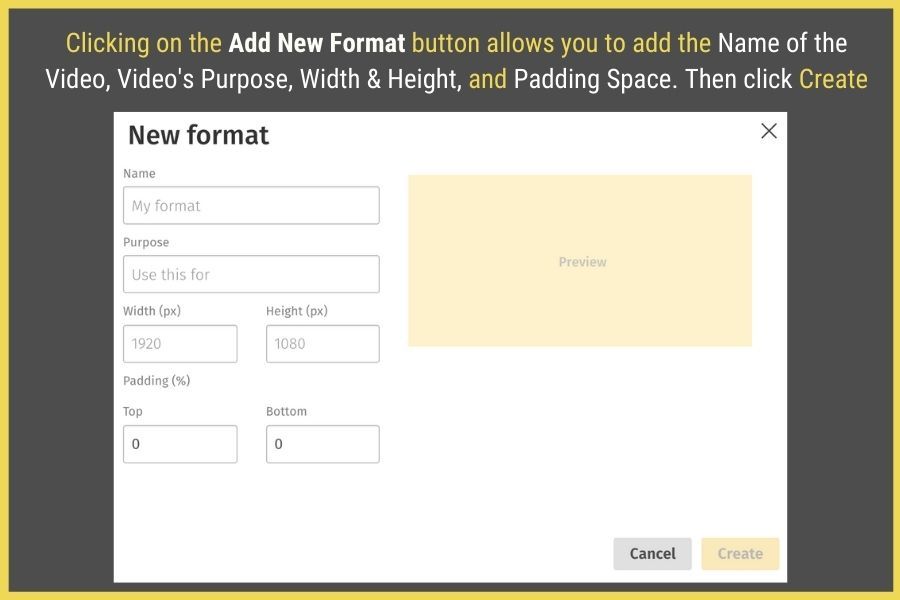
You can also create a custom format.
Add subtitles to Your Video
Typito offers you the simplest way to do this even letting you do other cool stuff like adding animations.
Even though you can use the tool to add subtitles the traditional way using an SRT file or manually, in this article we will be looking at how to do it in a much easier way.
Automatically Add captions on Typito
Gone are the days of painstakingly transcribing every word. Welcome to the future of AI-powered captioning!
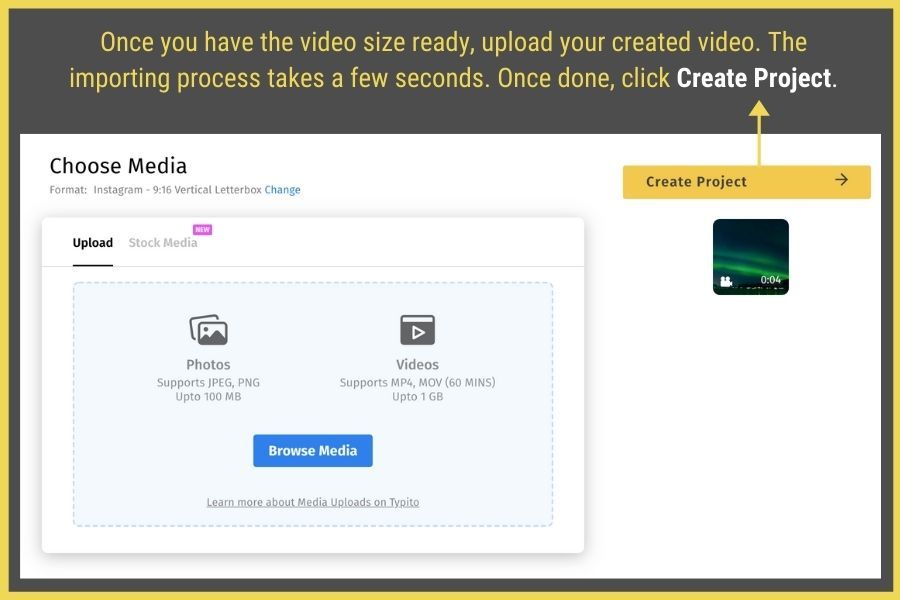
Step 1: Upload Your Video: Upload your masterpiece, and click on Create Project once you have already logged in to Typito.
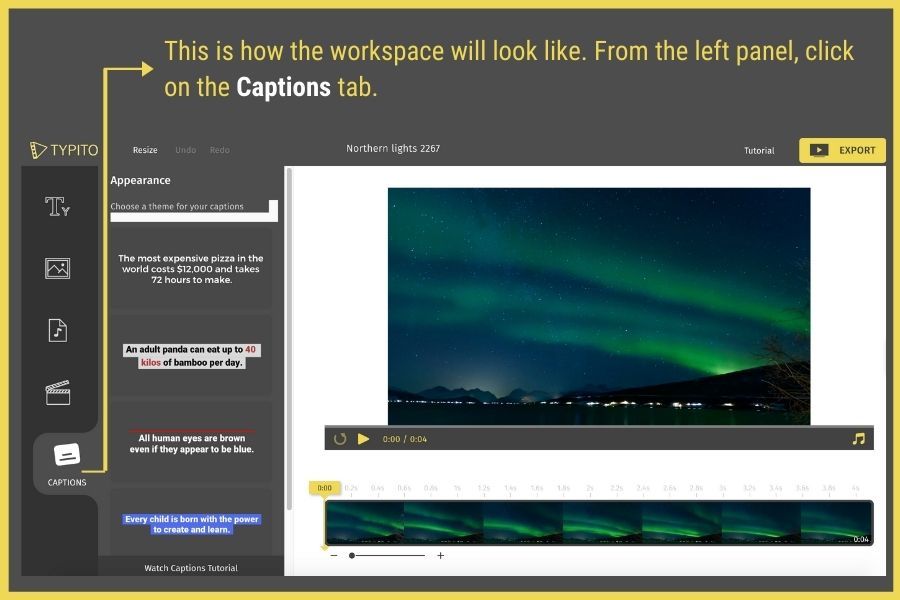
This is the video editing workspace where the fun begins. Select the captions tab from the left panel.
Step 2: Let AI Do Its Thing: Many platforms now offer auto-captioning features. It's like having a super-smart robot transcribe your video for you.
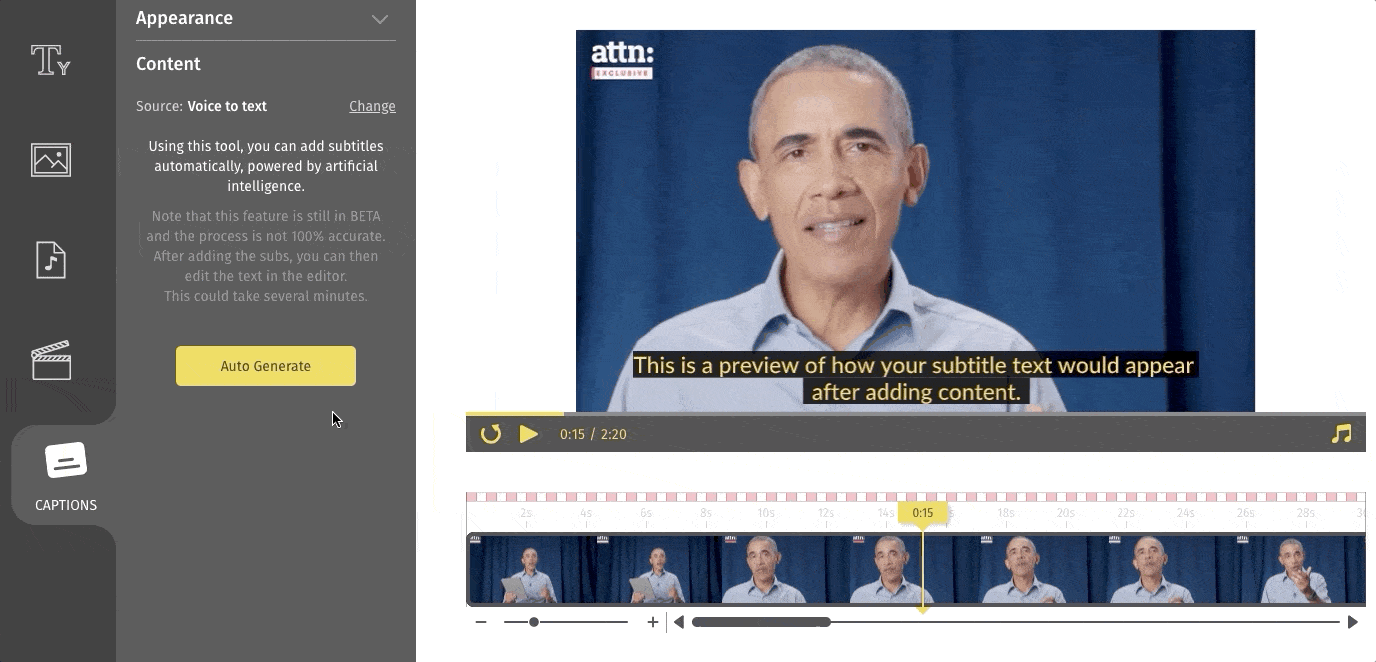
Step 3: Review and edit: Even AI can make mistakes so check the text once-over to catch any hiccups. You can also increase or decrease the letter spacing and line height here.
Working with Captions
Now that you have your base subtitles, it's time to make them shine!
Add Subtitles to Your Videos Online (Fast and Easy)
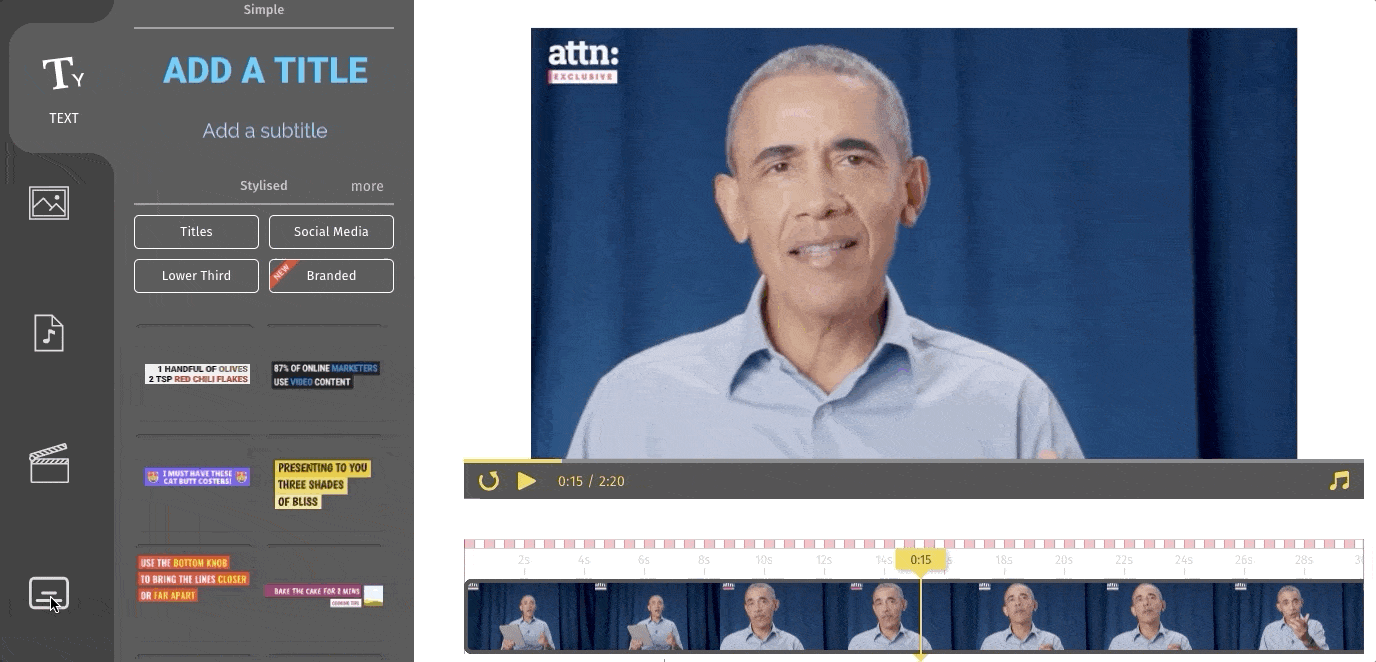
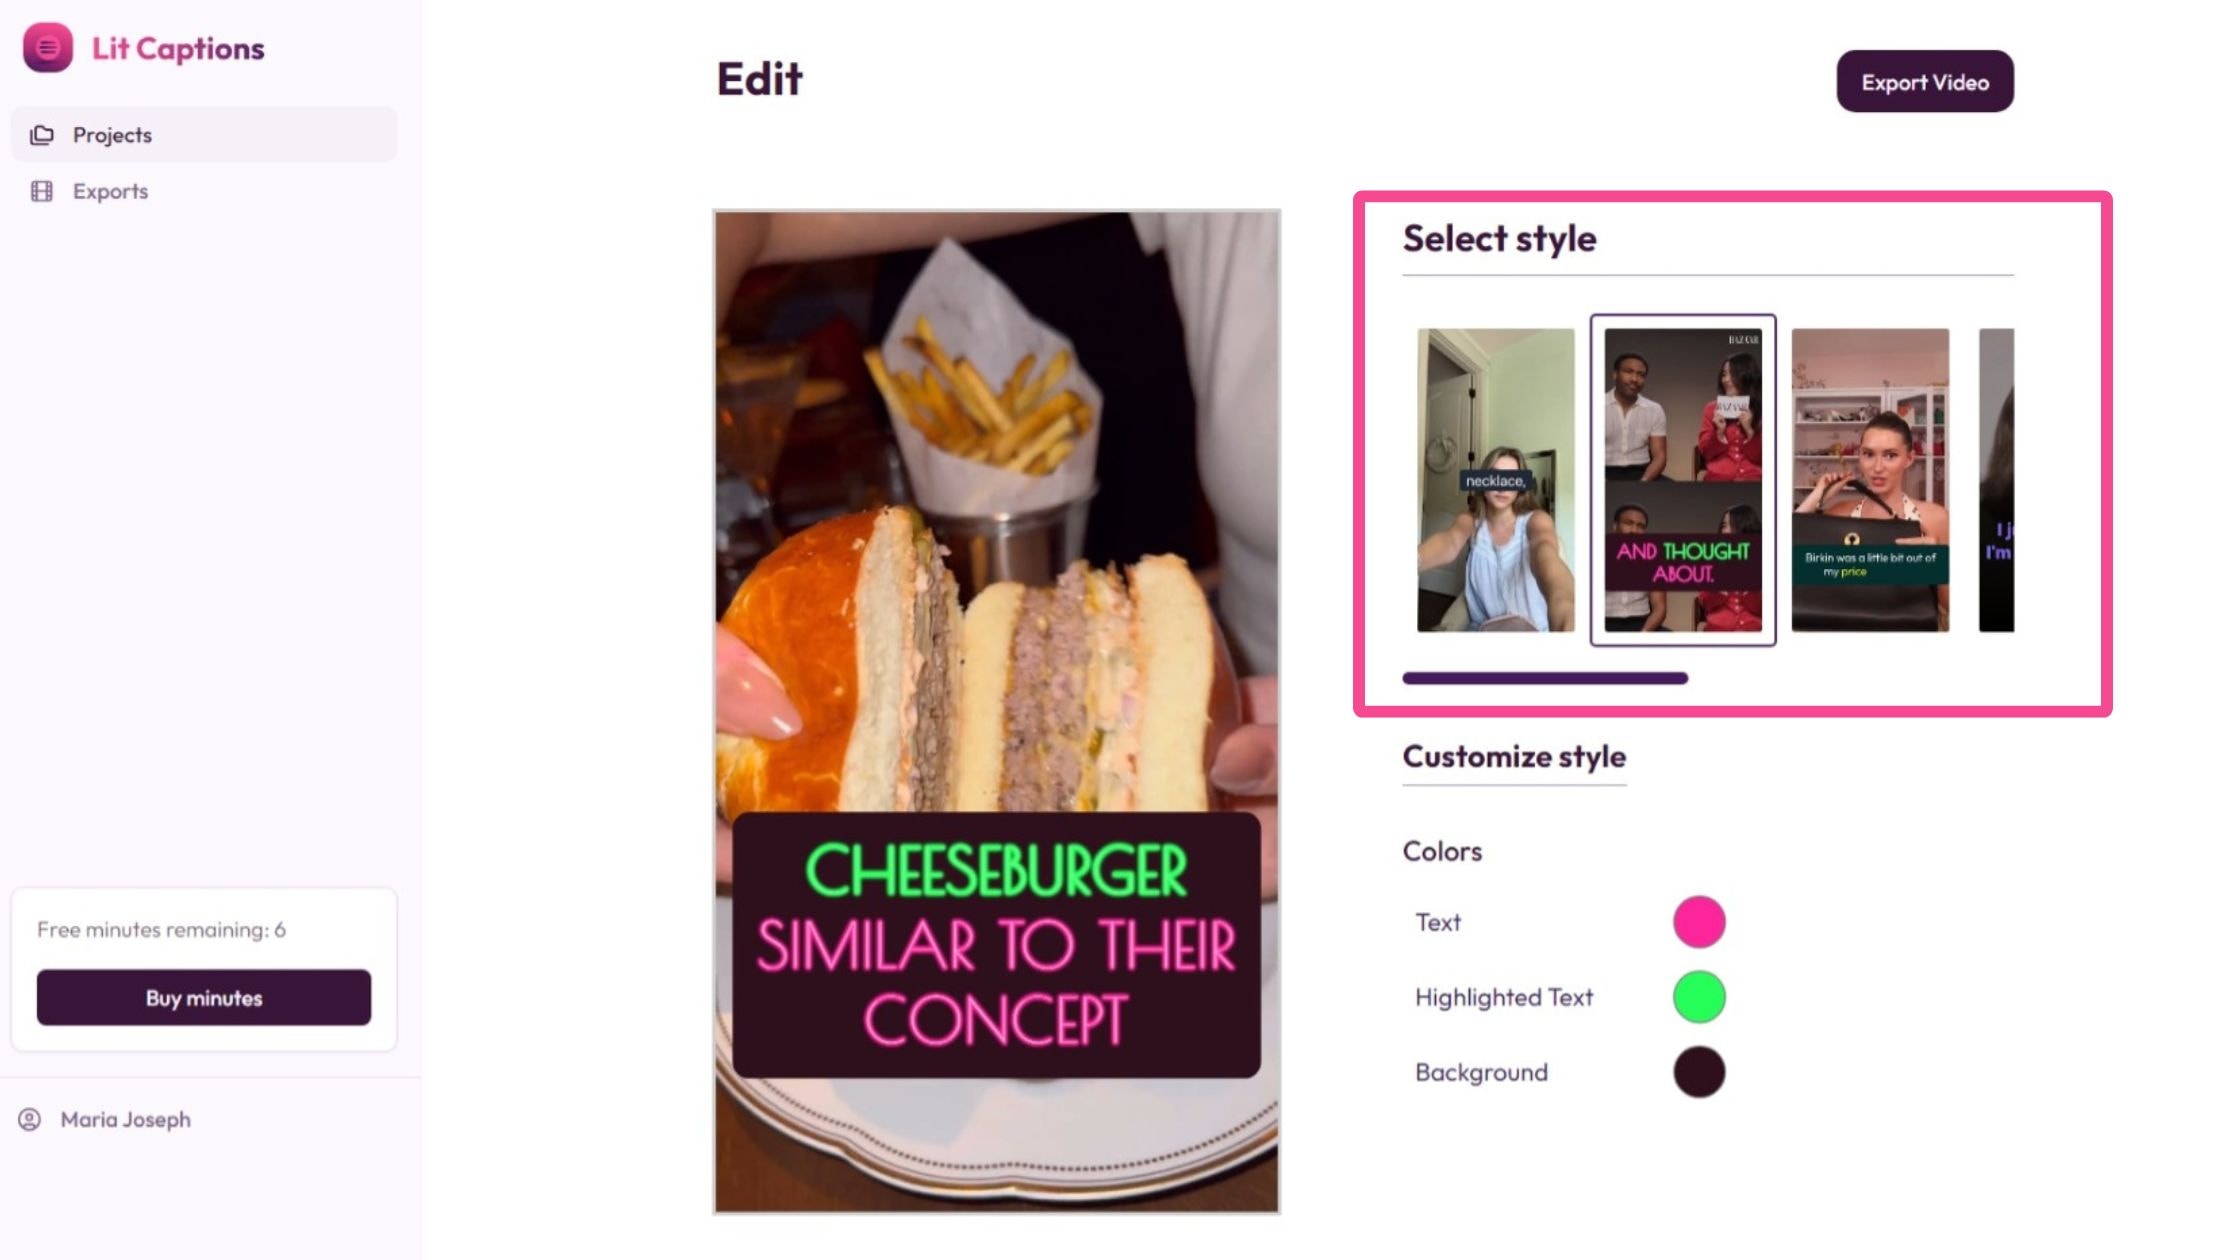
- Choose a template: Pick from various subtitle styles. Want your subtitles in hot pink Comic Sans? Go for it!
Navigate the Captions tab at the bottom. When you do that, you should see a variety of text themes to choose from.
You can choose one that complements your video. Clicking once on any of the subtitle templates will place a preview of it on the video.
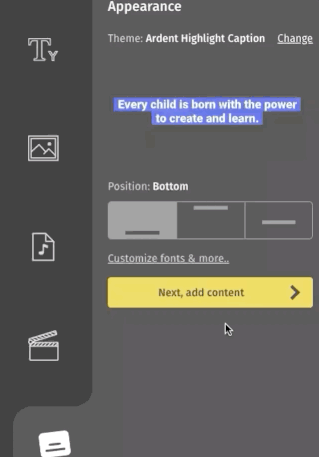
2. Customize: You will also see the “customize fonts & more” option and clicking on it will let you do different things. This is where things get fun.
You can use these features to beautify your subtitles:
- Position and Alignment: You can position your subtitles to the Bottom, Top, and Middle and Align the text to the left, center, or right.
- Font: Choose from 50+ font styles just by clicking the dropdown menu. You can upload your font as well. Learn more about it here. Customize the style, size, and colors, and add shadows.
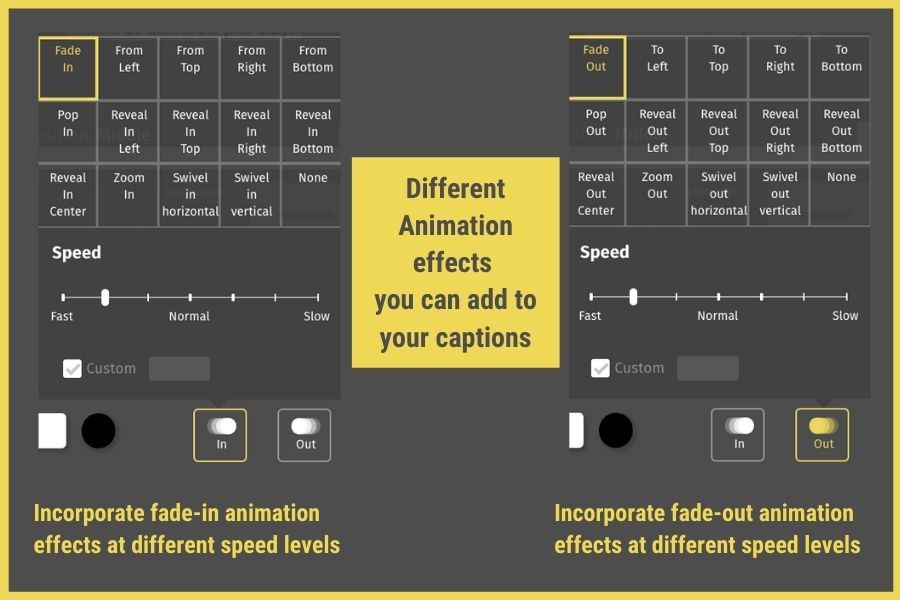
3. It's time to Animate: The “Animation” feature has two main options: In & Out
Interestingly, clicking on each of them will have a list of sub-options you can go about along with the speed at which you want your subtitles edit videos to be animated.
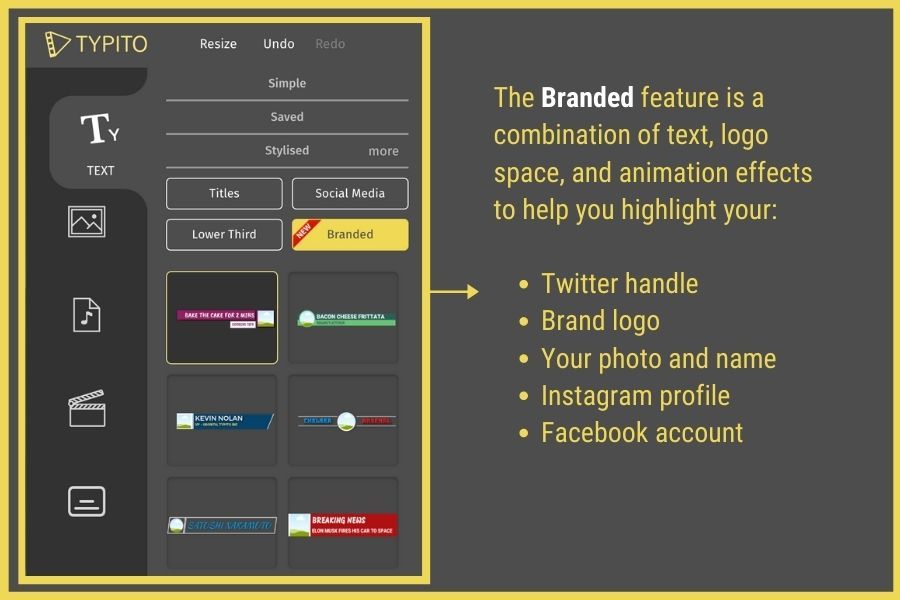
4. Branded Text templates: After you add subtitles create branded text templates to complement the video subtitles.
Export Your Video with subtitles.
You're in the home stretch! Time to edit and get your video with subtitles out into the world.
Download Options: Want to download subtitles and audio files keep a copy for yourself? Download your captioned video for safekeeping or further editing.
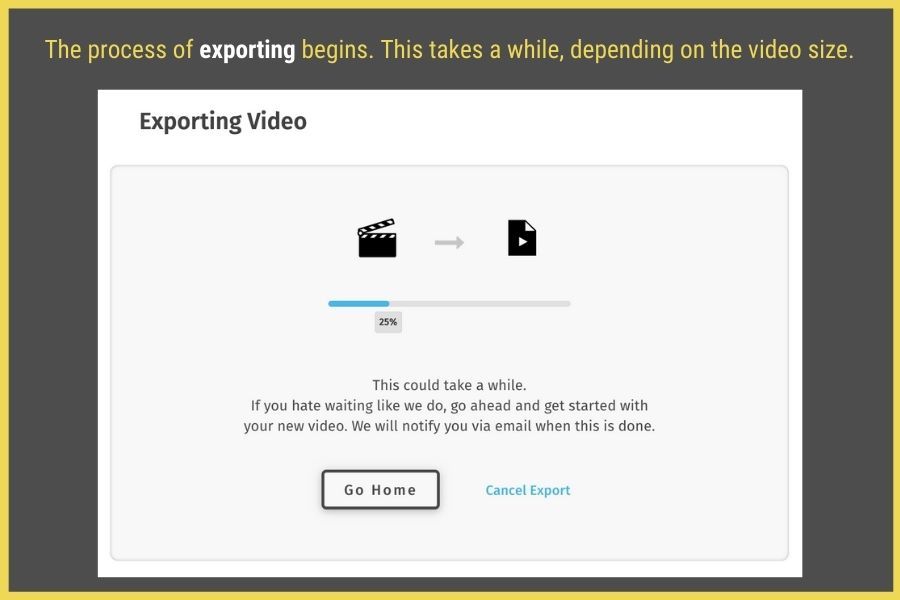
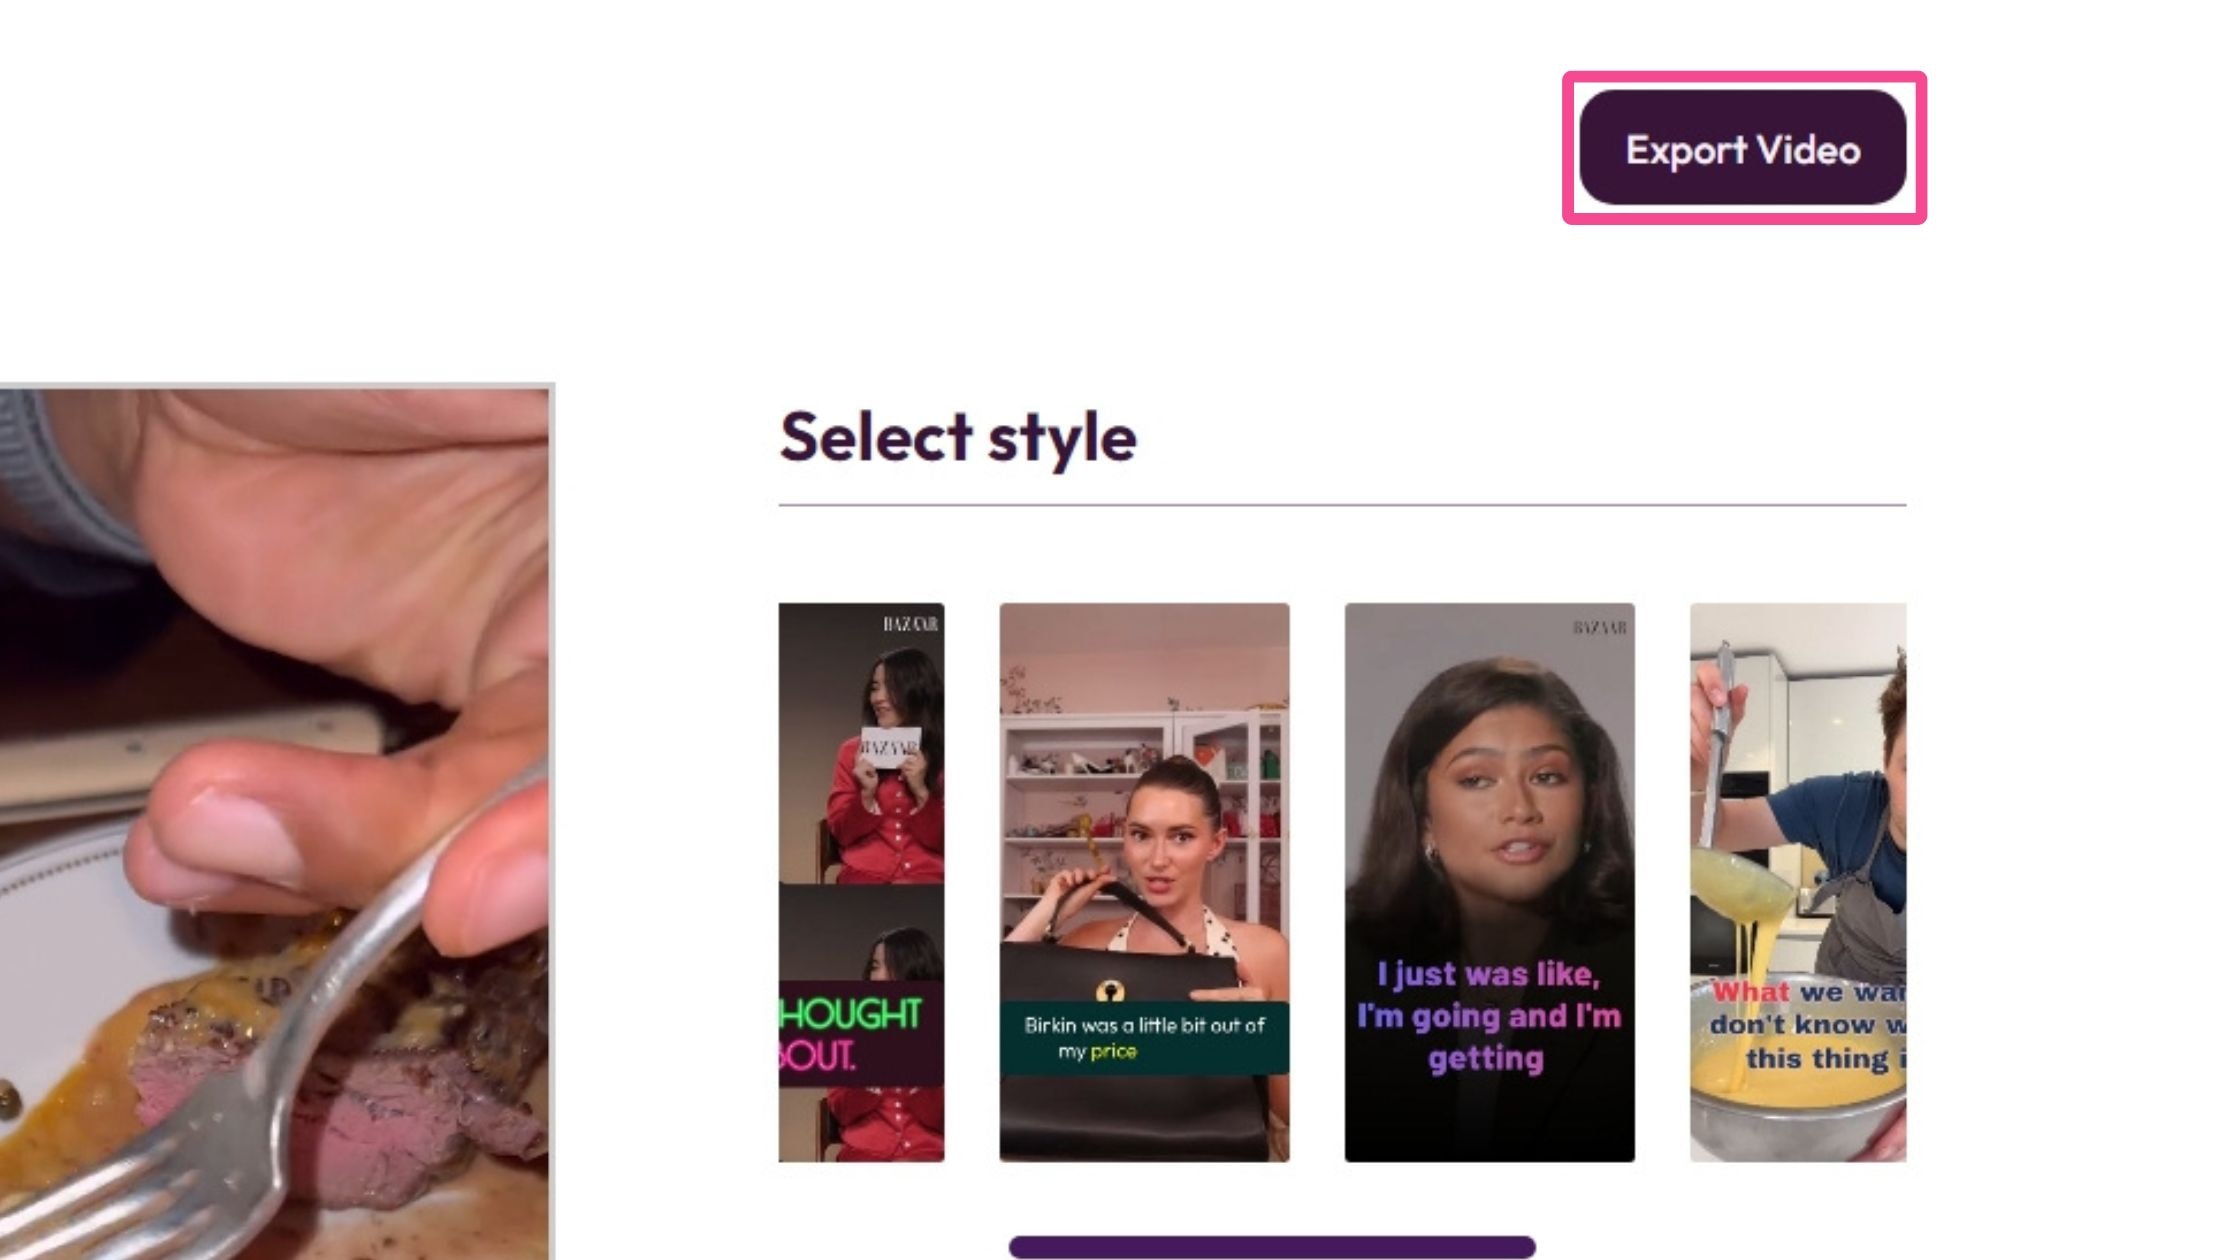
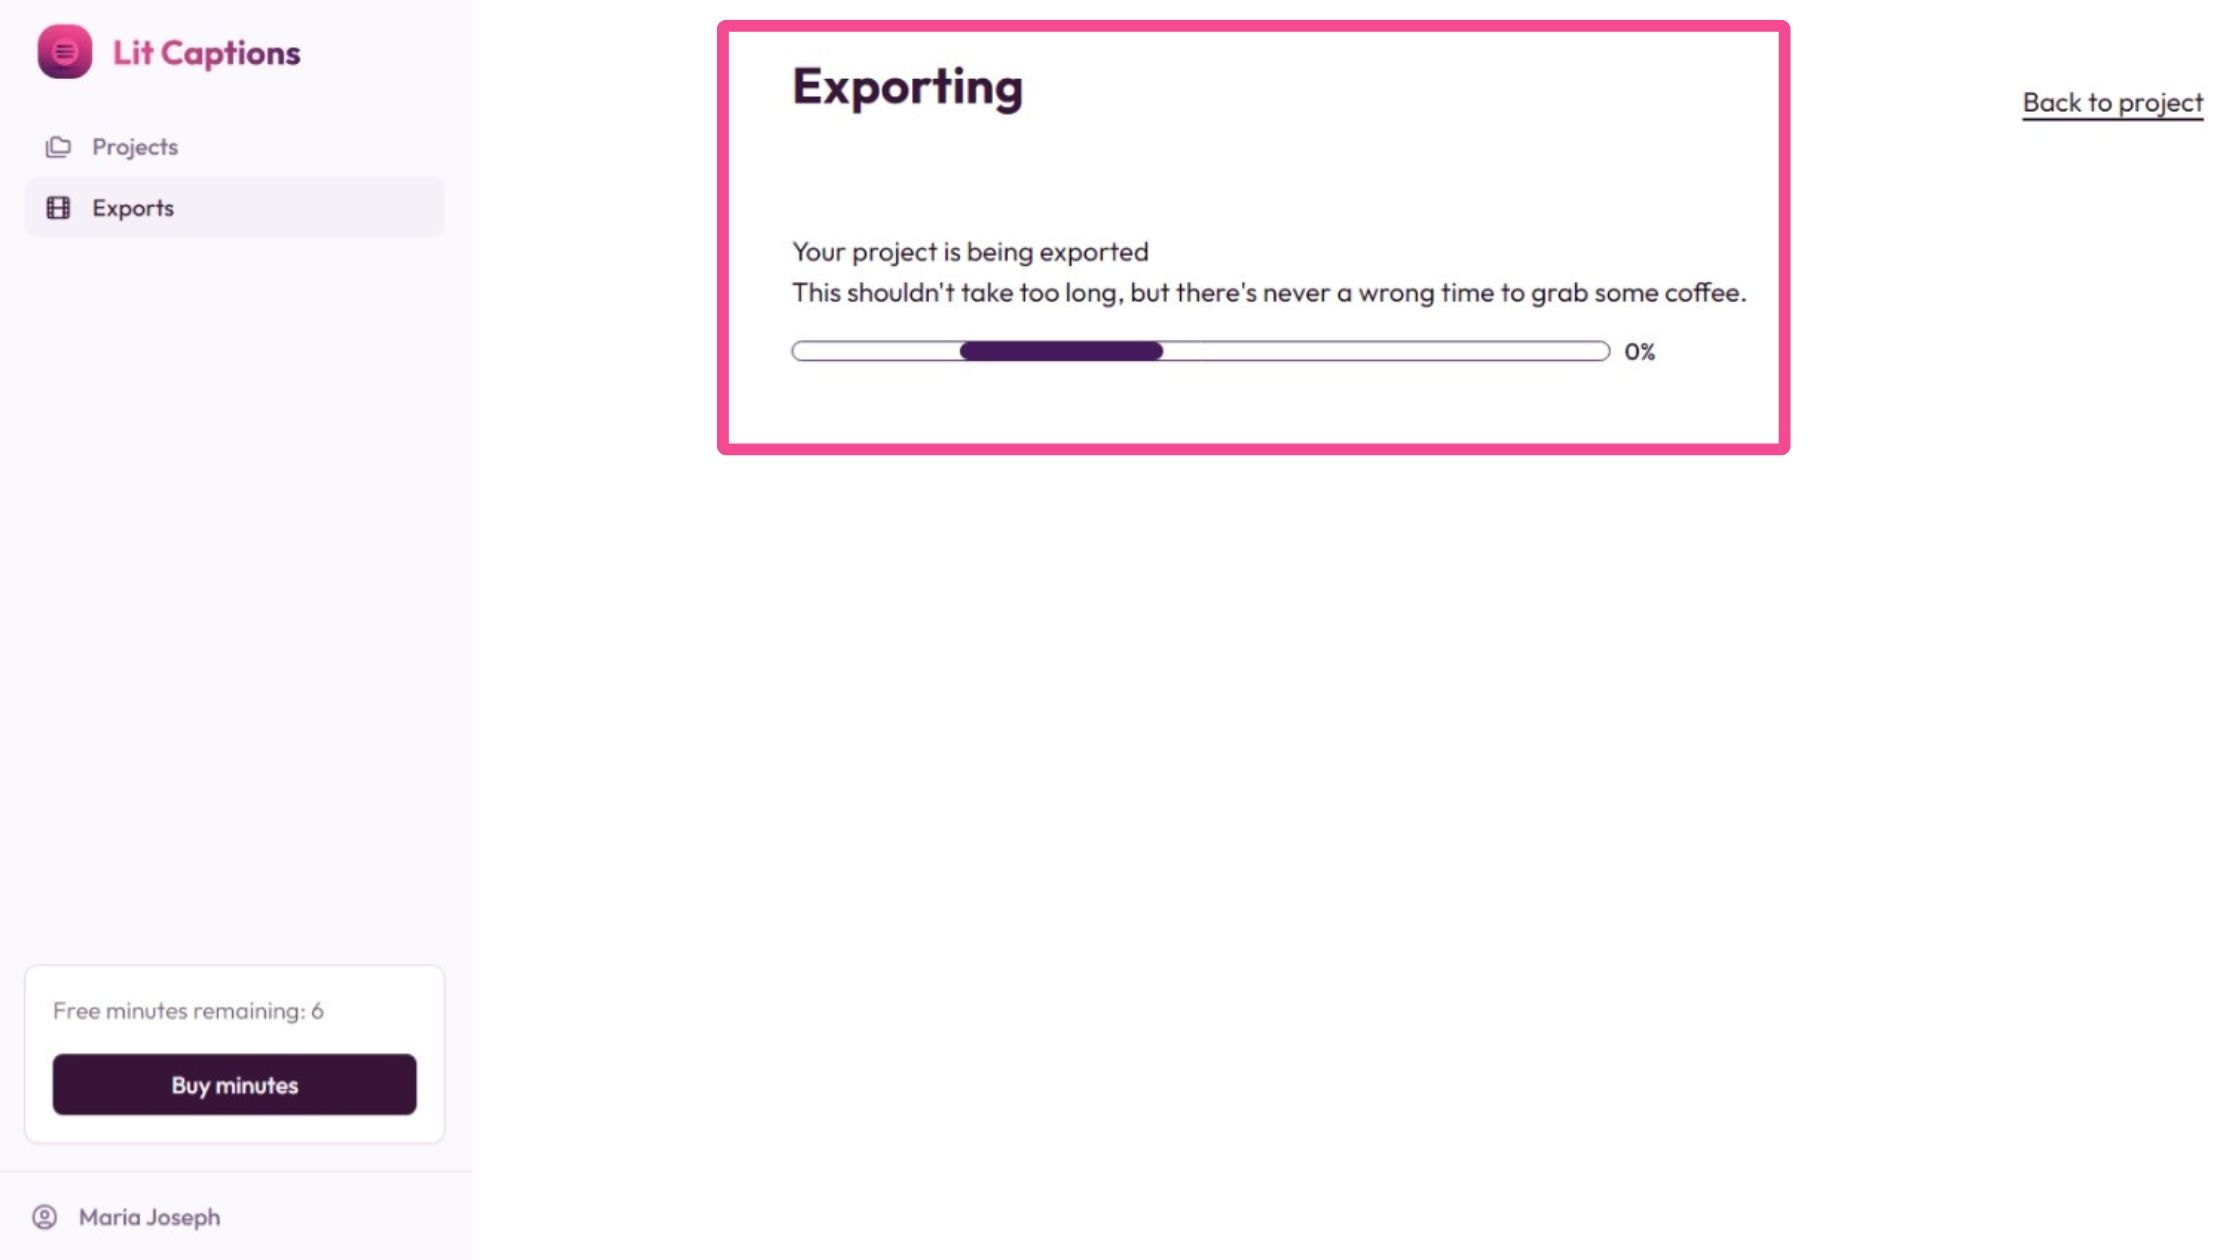
Click on the 'Export' button showing up on the top right. After you confirm that you are ready to export, the process begins.
Direct Sharing: Typito offers direct sharing to social media platforms. Facebook/Instagram, here you come!
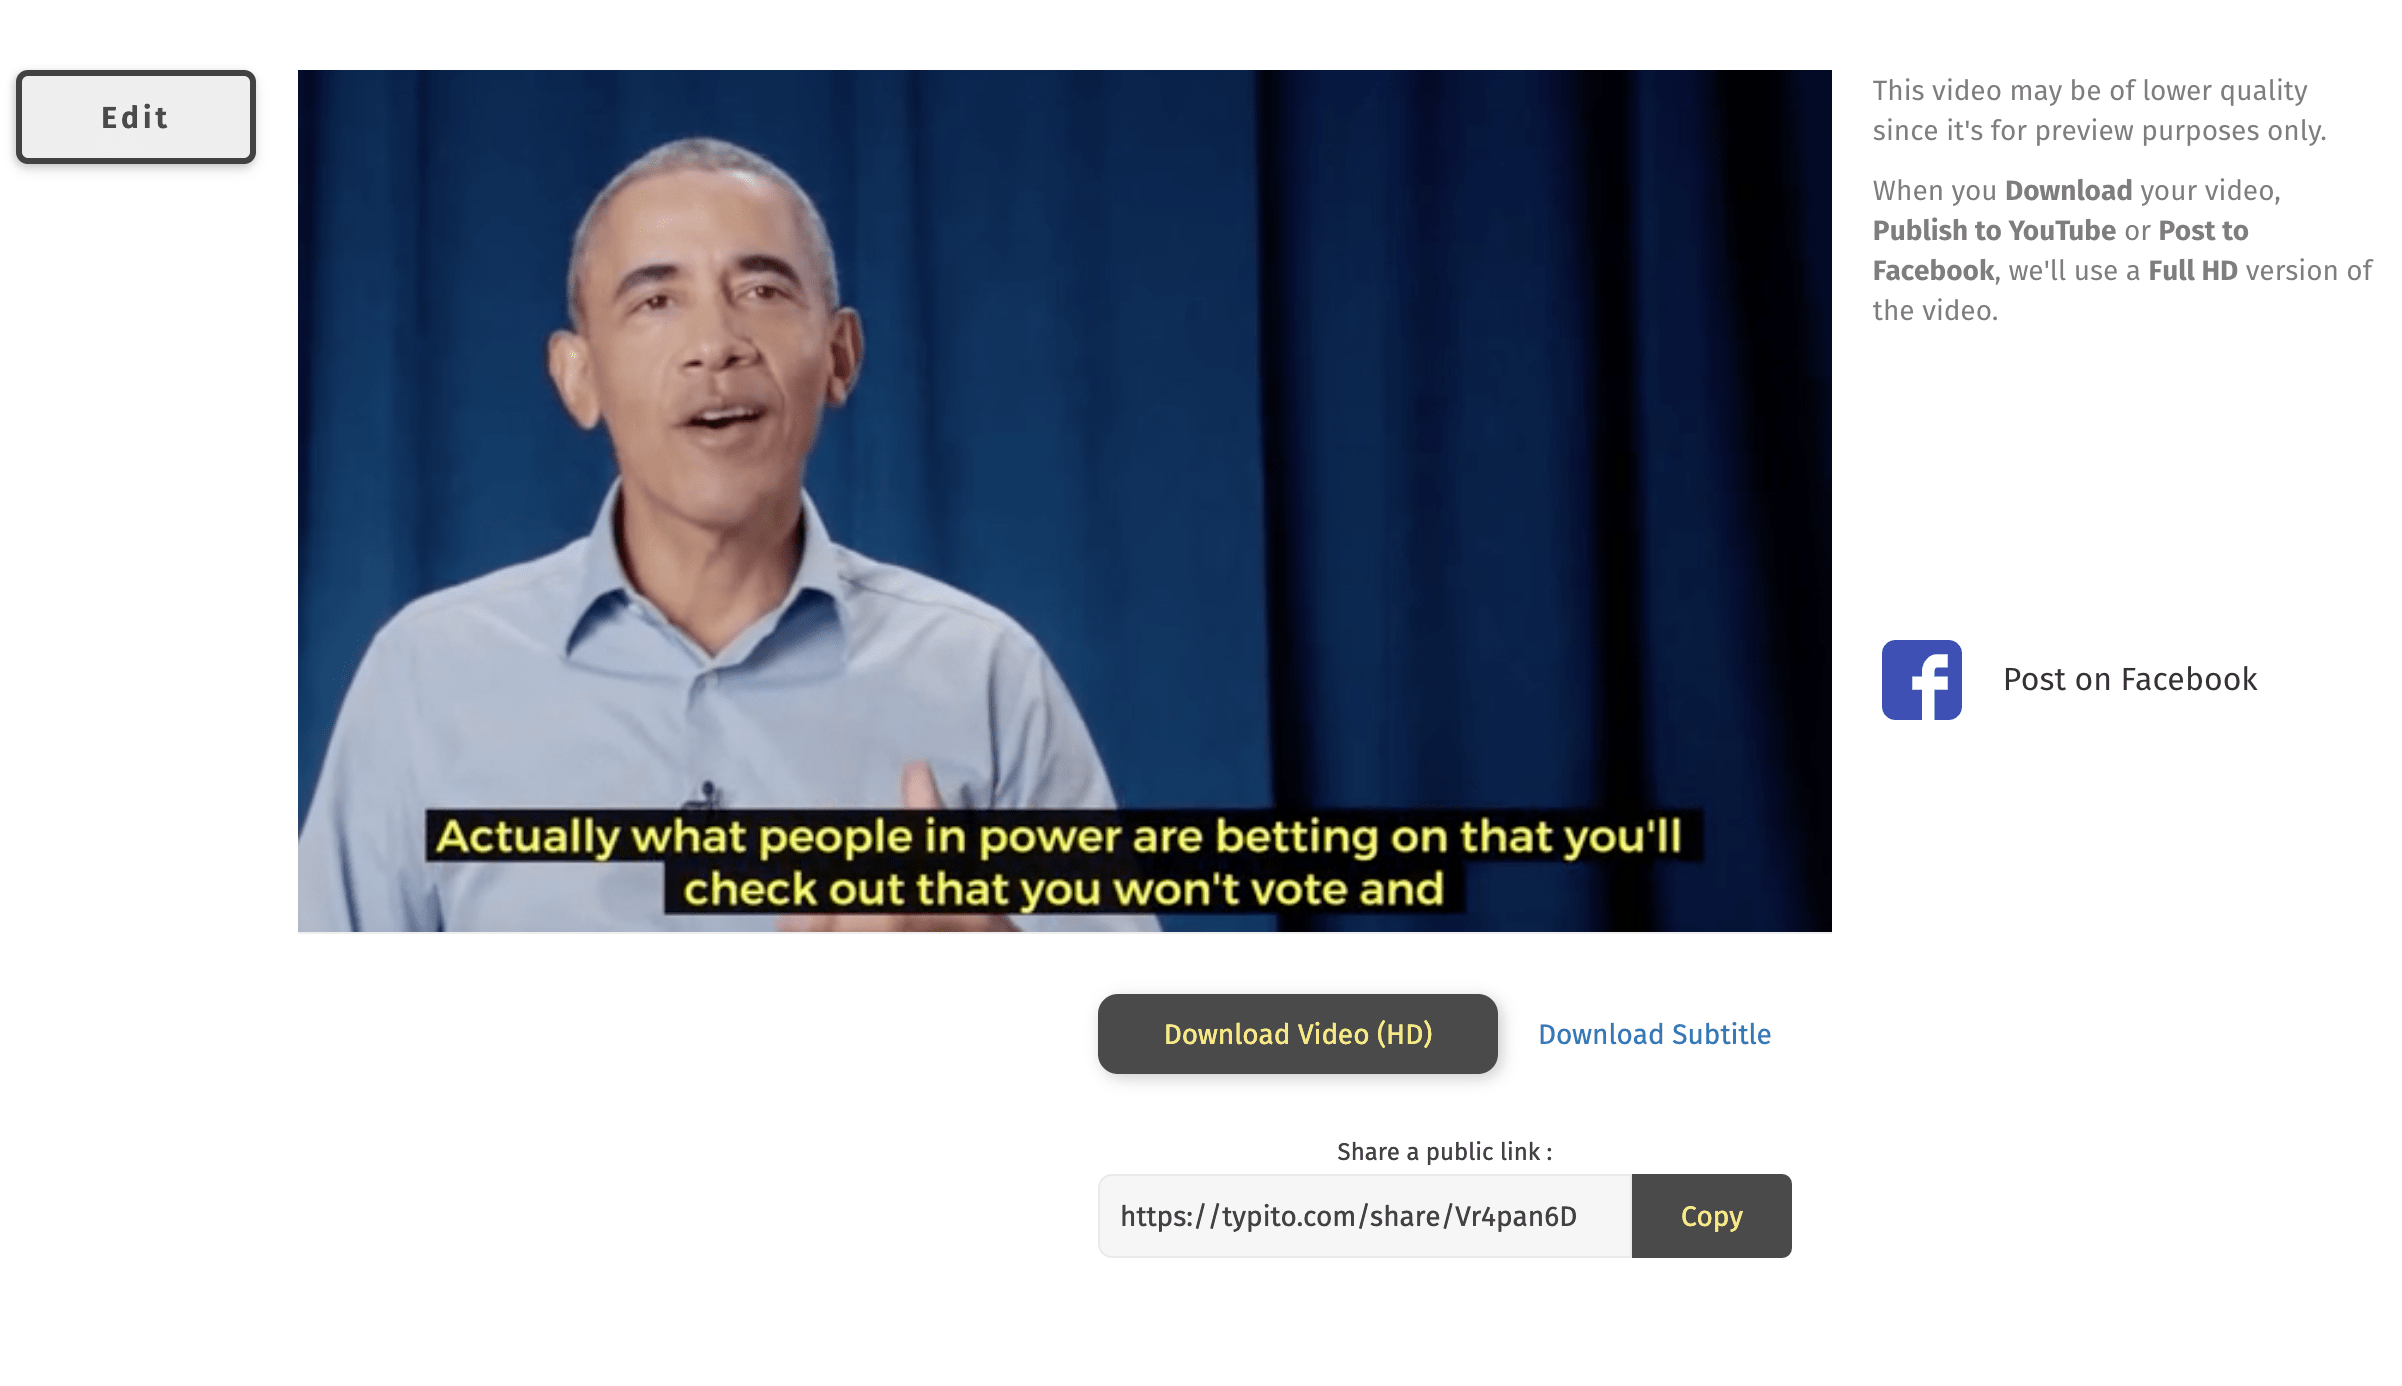
Downloading the subtitle file
The good thing is that Typito allows you to download the subtitle file separately for future usage or to improve SEO on the browser landing page or the website.
However, if you wish to make a few more changes, you can Edit the project easily. You can even edit the srt file. Learn how to edit an srt file using an srt editor online.
Want to add subtitles to your video that captivate and inform?
Choosing the Right Captioning Platform
With so many options out there, finding the right subtitle tool can feel overwhelming. Here's what to look for:
Feature-Rich Platform for AI-Powered Video Creation
- AI Capabilities: Look for platforms with robust autogenerate subtitles features.
- Language Support: The more languages supported, the better.
- User-Friendly Interface: You want a tool that's intuitive, not intimidating.
- Integration Options: Direct sharing to social media platforms is a big plus.
- Customization: The ability to tweak and style your subtitles is crucial.
The Best Captioning Tool for Your Vertical Videos
If you’ve been on any OG social media platform lately, you’ll notice that vertical, bite-sized videos like Reels and YouTube Shorts are dominating social media. Their screen coverage and quick-hit video content are winning over creators and viewers across all niches.
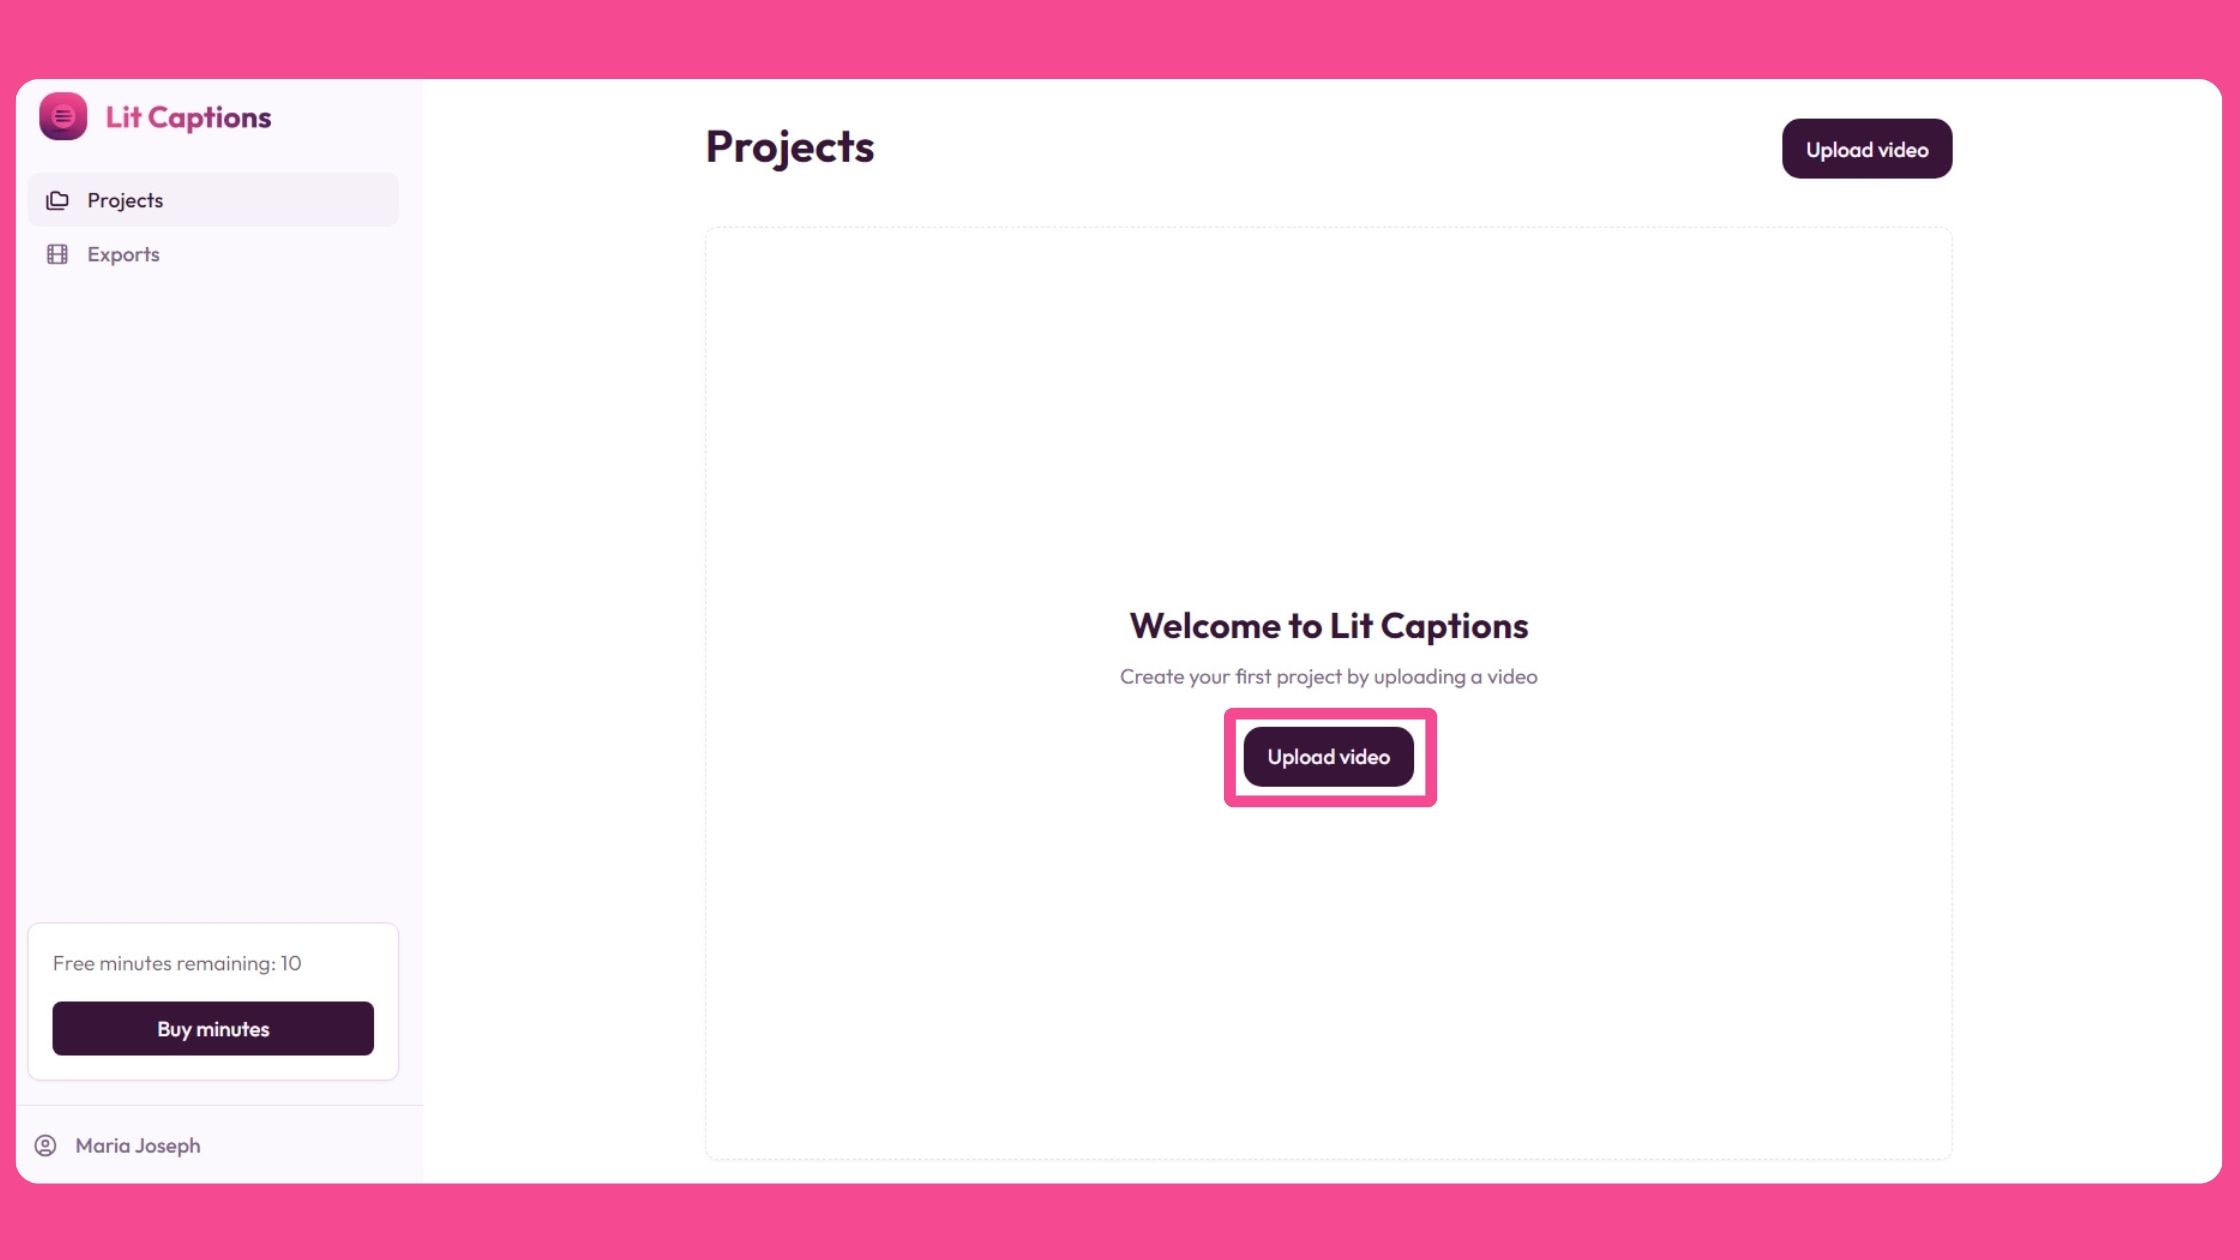
So to make your captioning journey easier, We’ve launched Lit Captions, a cutting-edge video editing AI tool designed specifically for your vertical social videos.
Here's more info why you need it for editing your vertical video:
Effortless Uploads: Just drag and drop your vertical videos, and you're ready to go.
AI-Powered Magic: The tool uses advanced AI to automatically generate surprisingly accurate subtitles.
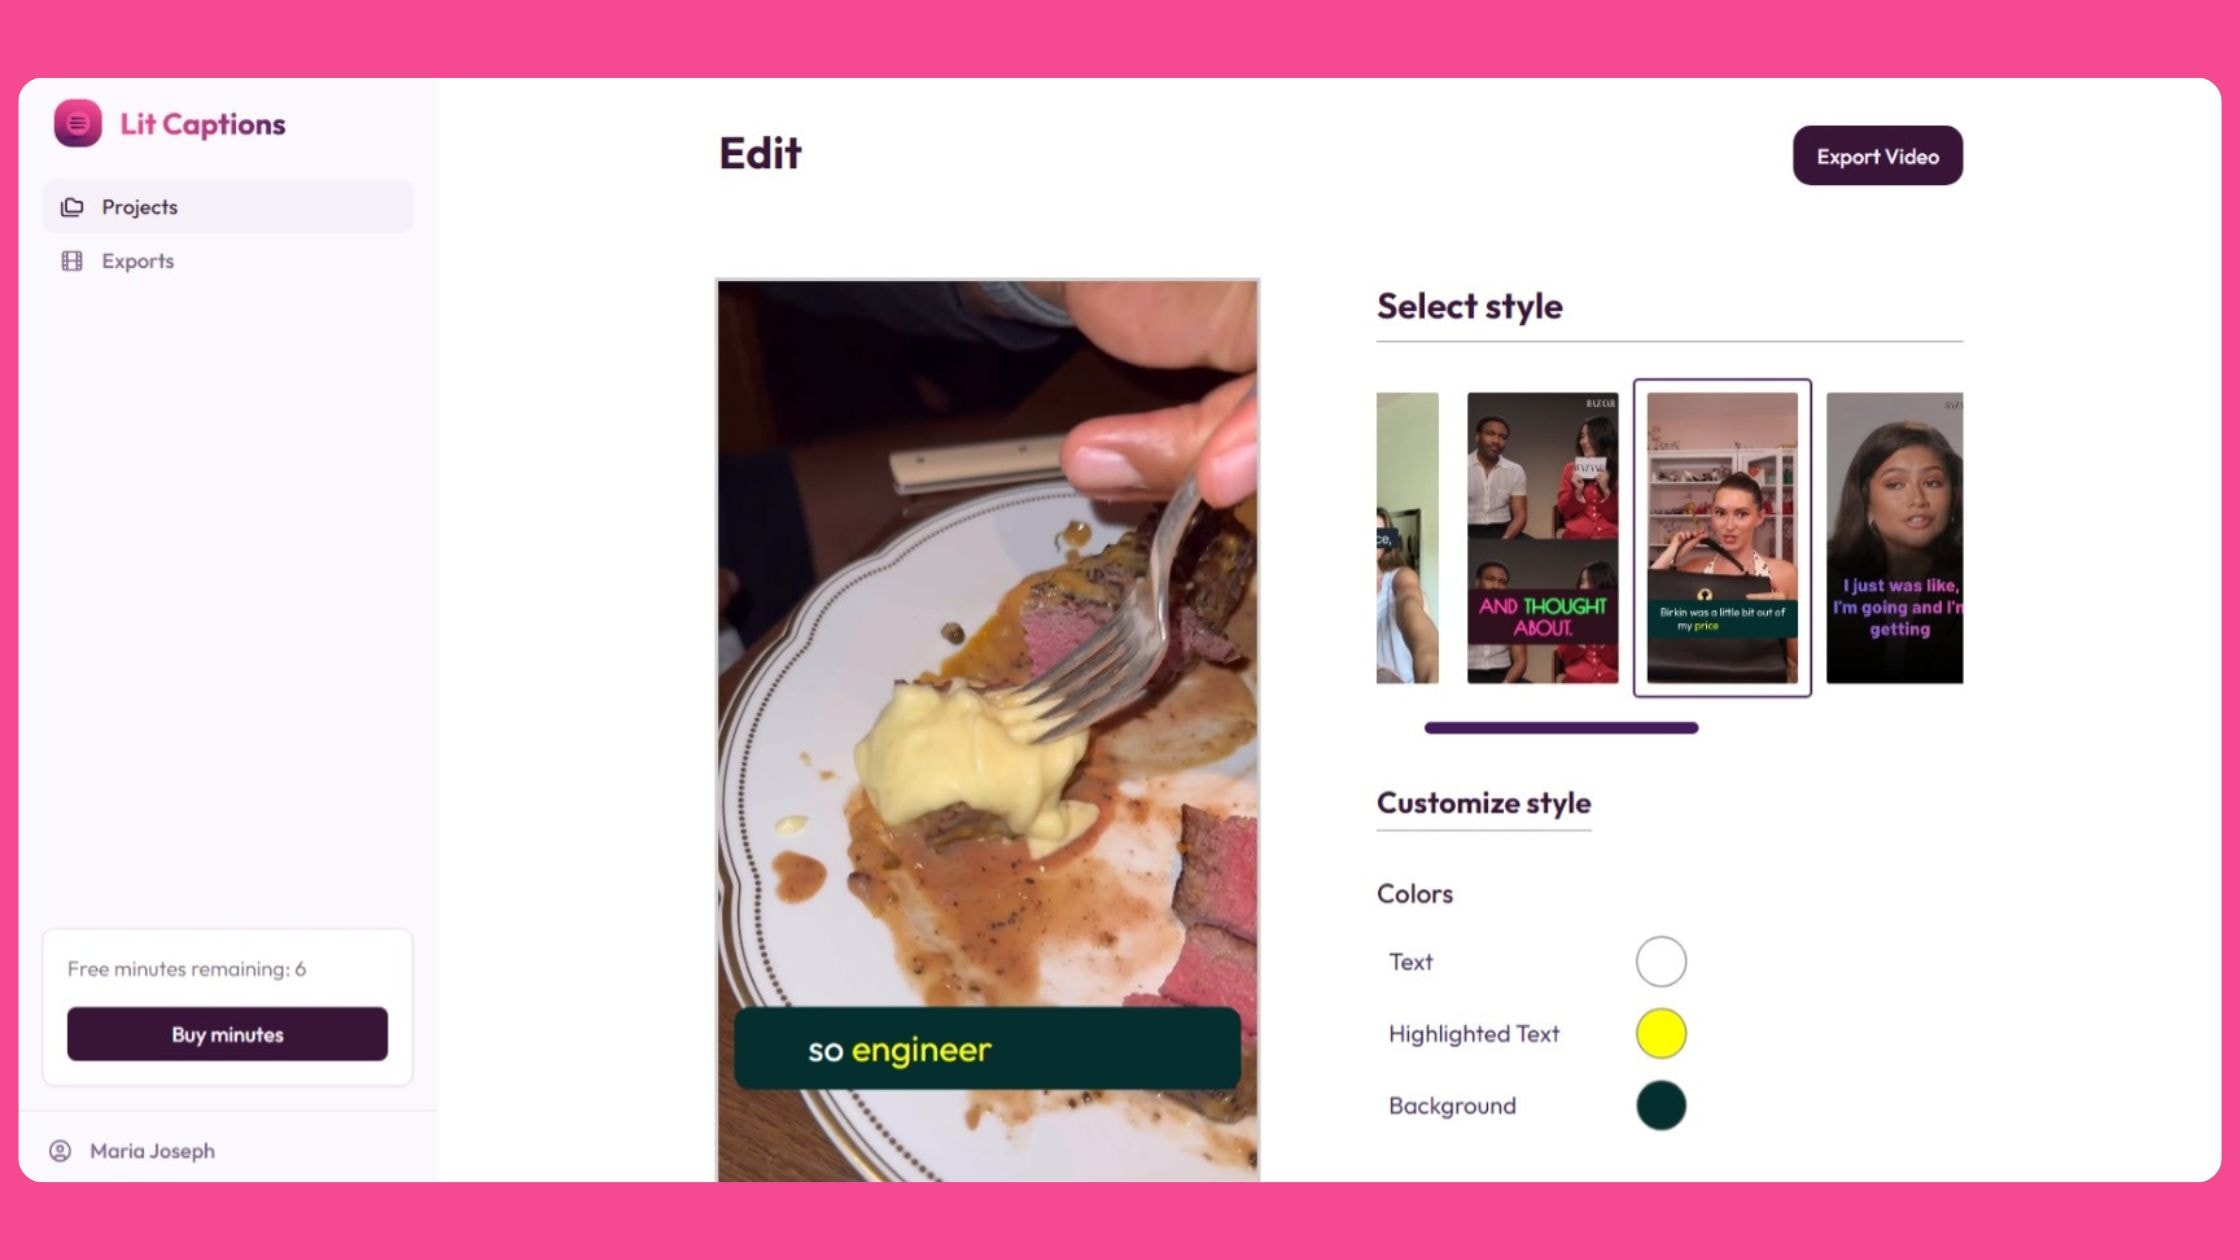
Style for Miles: Choose from a variety of eye-catching templates that make your subtitles pop.
One-Click Wonders: Add captions to your vertical videos with a single click. It's so easy, you might think you're dreaming.
Export with Ease: Your polished, captioned video is ready to hit social media in no time. Not to mention free of charge and watermarks for the first 10 minutes of exports.
Want to see instant vertical video magic? Add Lit Captions to your video and watch engagement soar!
Best Practices for Video Captioning
Now that you're a captioning convert, here are some pro tips to take your subtitles from meh to marvelous
Adding Subtitles for Accessibility and Engagement
- Keep it Clear: Use simple, easy-to-read fonts. Save the fancy scripts for your video titles.
- Color Contrast: Ensure your subtitles stand out against the video background. White text with a black outline is often a safe bet.
- Timing is Everything: Sync your subtitles perfectly with the audio. Viewers should be able to lip-read along if they want.
- Break it Up: Aim for no more than two lines of text per subtitle. Your viewers' eyes will thank you.
- Don't Cover the Action: Position your subtitles so they don't obscure important visual elements.
Troubleshooting and FAQs
Still have questions? We've got answers!
Frequently Asked Questions
- What is a subtitle file, and how do I create one? A subtitle file (like SRT or VTT) contains text and timing information for your subtitles. Many online captioning tools can help you create these files.
- Can I auto-generate subtitles for my video? Yes! Many online tools, including Lit Captions, offer AI-powered auto-captioning features.
- How do I translate subtitles for my video? Some advanced captioning tools like Typito offer translation features. Alternatively, you can translate your caption file manually or use a translation service.
- What is the best captioning platform for my needs? It depends on your specific requirements, but for vertical videos, Lit Captions is hard to beat. For more general video captioning, explore options like Typito or other online video editors with captioning features.
Wrapping Things Up...
Adding subtitles to your social media videos might seem like extra work, but trust us, it's worth it. Not only does it make your content more accessible, but it also boosts engagement, improves SEO, and lets your viewers enjoy your videos even when they're supposed to be quietly working (we won't tell).
So, ready to give video captioning a shot? Whether you're working with traditional landscape videos or jumping on the vertical video captions and closed captions bandwagon with tools like Lit Captions, there's never been a better time to start captioning.
Remember, in the world of online video, silence isn't always golden - but great captions to your videos always are. Now go forth and caption those videos like a pro!
Curious to explore the advanced auto-captioning and customization features on the Typito editor?
Prefer to check out fun and engaging templates on the one click wonder for your vertical videos?