![How to Create a Moving Picture Effect [Add motion to photos]](/blog/content/images/2023/07/Blog-Articles---Featured-Images-Illos--60-.png)
Have you ever looked at a photograph you’ve taken and wished it could burst into life, telling a captivating story with movement? Well, now you can!
Knowing how to add motion animation to images and photos can be a handy skill. Whether you're an aspiring photographer, a content creator, or simply someone who loves to add a dash of magic to your pictures.
Understanding Photo Motion Effects
What exactly are photo motion effects? To describe it simply, these are minimal animation effects added to a photo or image.
This could include animation effects like a subtle Zoom in or out, a pan, a fade, or a blur. Subtle motion animations like these can add depth and visually enhance your photos. Here's an example of how simple animations can enhance a still photo.
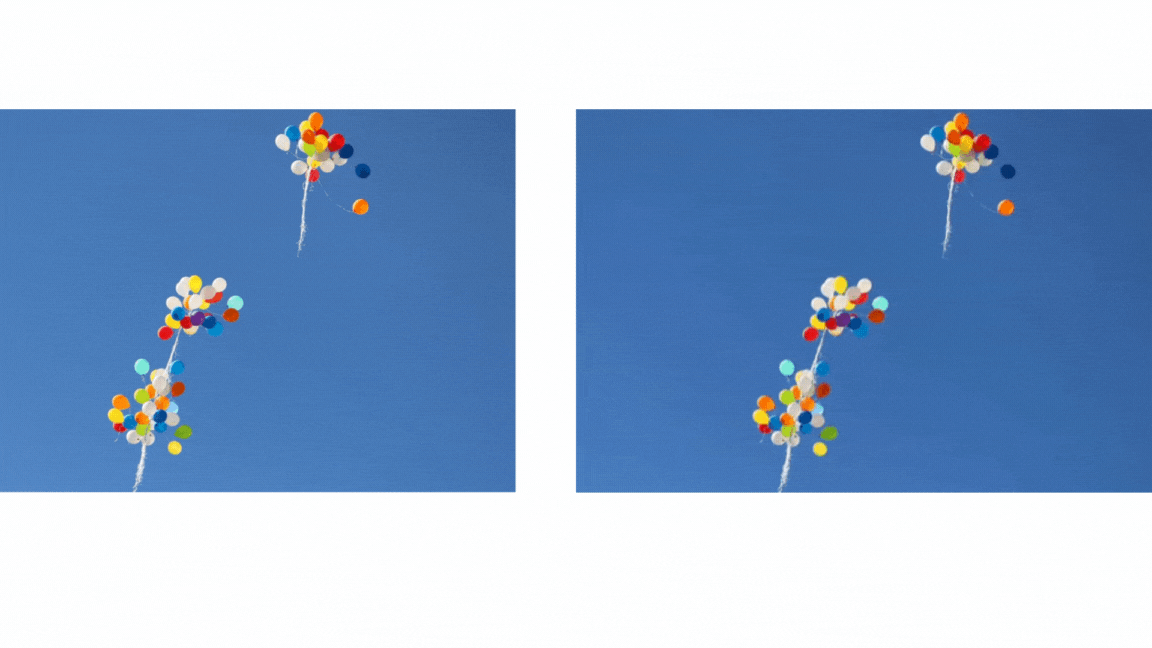
You’ve probably noticed kinetic photos used in video ad campaigns and slideshows to create enhanced visual experiences. They’re also a great way to give your content a creative edge, since they’re more engaging than a still image, and yet require less attention than a whole video.
If you’re wondering how this works in a video - here’s an ad campaign by Nike that uses motion on still images to add depth to photo clips used in the video [0:06]:
In this guide, we'll walk you through everything you need to know about adding motion animation to your photos.
How to Add Simple Animations to Still Images
Tips & Techniques for Stunning Motion Effects
Choosing the Right Tool
How to Add Simple Animations to Still Images
Now, let’s get into the easiest way you can add simple animations to images online. Typito is perfect if you're a beginner looking to add simple animations to still images.
In this tutorial, we’ll look at how to add motion to an image, and how to add motion effects to image overlays (picture-in-picture animation).
Here is a quick breakdown of the step-by-step guide to creating dynamic moving images with animations and transitions:
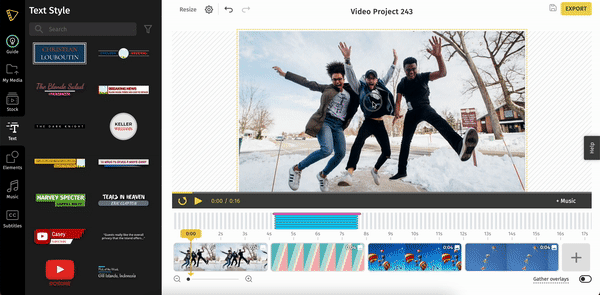
Step 1: Head over to Typito and upload your images and photos
Step 2: Choose and add animations to images
- Add motion to a whole image
- Picture-in-Picture Motion
Step 3: Preview and adjust the animation.
Step 4: Saving and exporting your motion-enhanced photo
Now let's look at the steps in detail.
Step 1: Head over to Typito and upload your video.
Head over to Typito.com from your browser. You can create a new account or get started for free.
Click - Create a new project, and now choose an aspect ratio.
Note: Don’t worry about your image having a different aspect ratio. We can adjust this later. Choose an aspect ratio that you would like your final video to be.

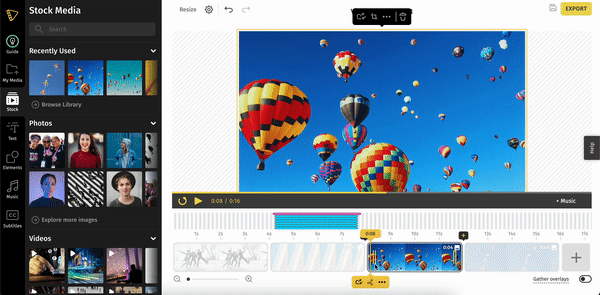
Click My Uploads from the left panel to view your uploaded images (if you’ve uploaded multiple images).
Once it’s uploaded click the clips to add it to your Canvas.
Step 2: Choose and add animation to the image.
Now let’s get to the fun part - animating your images.
There are 2 ways you can add motion to pictures with Typito:
- Adding motion animation to images and photos as clips
- Adding motion animation image overlays
First, let’s look at adding motion animation to images.
- Hover over the preview thumbnails to get a quick view of what the motion animation looks like.
- Once you’ve chosen an animation effect, click it to add it to your image.
- Now click the Play button on your canvas to see what this looks like.
Now let’s look at how to add motion animation to image overlays or picture-in-picture animation.

- Click the image on the canvas and then click ‘More Options’ (three dots in the action bar).
- Now, from the left panel you can choose the animation and adjust the timer.
- You can choose a different animation for the entry and exit of the image overlay.
Before adding motion effects, make a backup of the original photo. This way, you can always go back to the unaltered version if needed.
Step 3: Preview and fine-tune the animation
You can explore more editing tools like cutting, cropping, etc. Once you’re done with all the final touches, click Export in the top right corner of the editor.
Once your export is finished you click the download button to download your video.

If possible, ask for feedback from people in your team (or a friend with an eye for design!) before finalizing the animation.
Sometimes you can get constructive feedback that can help. You can always come back to your saved project on Typito and make more changes if needed.
Finally, don’t forget to have fun! Feel free to experiment and have fun with various animations to discover unique and striking effects.
Keep in mind where the animated photo will be displayed. Different platforms have varying support for motion effects, and you may need to optimize the animation accordingly.
Tips and Techniques for Stunning Motion Effects
Tips to keep in mind to make sure you get the best out of your photo animations.
1. Choose the right photo
You want to opt for high-quality, visually engaging images for the best results. Using blurry or low-resolution photos can distort the animation effect.
2. Pay attention to the composition of your photo.
The motion effects you add to your image will draw attention to the moving elements, so make sure the subject is clear and well-positioned.
3. Understand the story
Consider the story you’re telling and ensure you align the motion effects with the narrative of the photo to enhance its impact.
4. Choose subtle animations
Subtle animations can be more visually appealing and less distracting than over-the-top effects. When adding any animation to an image or video, you want to aim for a balance that complements the overall feel of the image.
5. Adjust the speed
Ensure the speed and duration of the motion match the context of the photo. Optimal timing can greatly enhance the effectiveness of the animation almost making it appear real.
6. Stay true to the photo's style
The motion effects should complement the overall style of the photo. Ensure that the animation aligns with the photo's tone, theme, and aesthetics.
7. Optimize file size
Animated photos can be larger in file size, which might impact how it appears on websites or slow down presentations. Compress the animation, if necessary, without compromising quality.
Choosing the Right Tool
With numerous photo animation software vying for your attention, how do you narrow down the perfect match for your artistic aspirations?
Your choice of tool really depends on the kind of animation you want to add to your image and if you’re looking for a basic or advanced tool to help you.
Here are some factors to consider when choosing a tool to add motion to your photos:
✅ Is it easy to use?
✅ Does it offer a variety of animation styles?
✅ Is the software compatible with my system?
For Beginners: For those taking their first steps into the world of photo animation, we recommend starting with a tool like Typito. It's incredibly easy to use, can save you a lot of time, and works from your browser (which means it’s compatible with almost any system). You'll be able to add simple photo animation styles like Zoom in/out, Pan left/right or up/down, and more, but you'll be able to do so at the click of a button.
For Advanced Users: If you're an animation enthusiast ready to push the boundaries of creativity, you may need an alternate tool like Adobe Express or Vimage. Advanced animation tools like these have advanced features and customization options that allow you to create animations that are truly one-of-a-kind, tailored precisely to your artistic vision.
Whichever tool you pick, don't shy away from trying different animation techniques and exploring various other software options; after all, the magic lies in discovering your personal style and a tool that allows you to easily express that style to its full potential.
In the end,
We hope this mini-guide helped you understand how to easily create motion-enhanced photos even if you’re a beginner to image editing and animation, how to choose the right tool, and some key tips to keep in mind to make sure you get the most out of your animated images.
Adding motion to images isn't just about aesthetics; it's a storytelling superpower!
Animated images have the ability to immerse viewers, evoke emotions, and convey impact. Whether you're telling a brand story, sharing a personal journey, or presenting a product, motion can be the key to resonating with your audience on a deeper level.
Motion-enhanced images have the innate ability to captivate, making your content stand out from the crowd. Imagine your travel photos with flowing rivers, your family portraits in delightful motion, or your product images showcasing their features dynamically.
Typito was designed to take away the anxiety of video editing so you can tell stories with ease. If you're ready to explore easy video editing, let's get you started for free.
Happy Animating!